Getting Ready for Your First Guided Climbing Day in Zion with Gear Included
Apr 16, 2026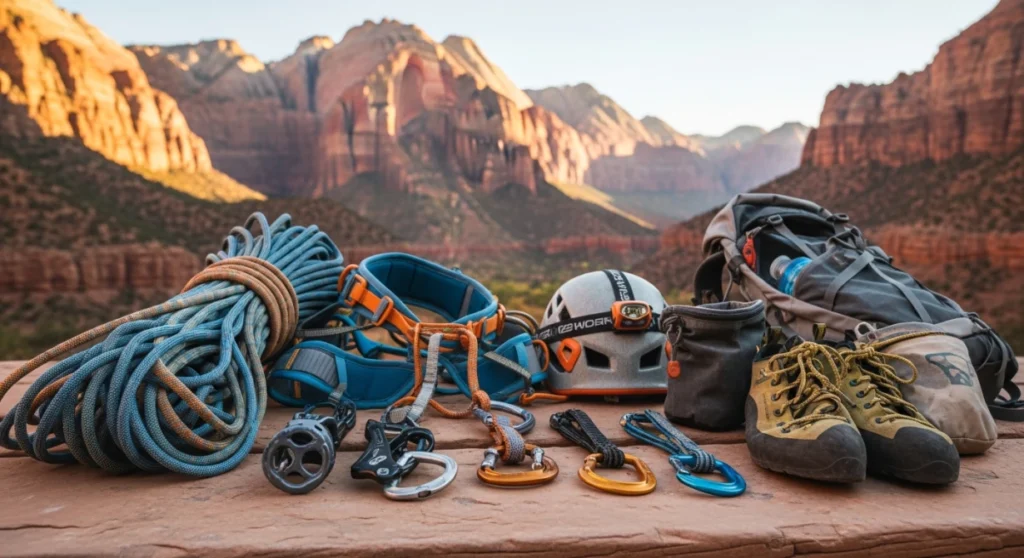
Assess your fitness and comfort with heights, clarify logistics with your guide, pack light but intentional, and stay flexible with objectives so your first guided Zion climbing day feels safe, focused, and rewarding.
Most nervous first-timers in Zion show up with one of two problems. They either bring everything they own and overheat on the approach, or they trust “the guide will handle it” and arrive without the basics they personally need. Both make your day less fun and a lot more stressful than it has to be.
Routes in the canyon feel very different from a gym wall or a short local crag. Approaches can be sandy, the sun is strong even in cooler months, and you may be far from the car for hours. A little planning before your first guided climbing day shifts the focus away from “am I ready for this?” and toward actually enjoying each pitch.
Let us walk through how to decide if a guided day is right for you now, how to prepare your body and your pack, what the day will usually look like, and how to tell you are set up for a safe, confidence-building experience.
When a Guided Climbing Day in Zion Is (and Is Not) the Right Move
Before you book, it helps to be honest about your fitness, expectations, and schedule. Not every traveler needs a rope day on the sandstone, and not every day of a Utah trip is the right time to try it.
Good signs you are ready for a guided day
- Basic comfort on your feet: You can hike 3 to 5 miles on uneven trails, with some uphill, without it wiping you out for the rest of the day.
- No crippling fear of heights: Feeling a little nervous is normal, but you can look down from a viewpoint or balcony without freezing.
- Curiosity about rope systems: You want to learn how belaying, communication, and movement on real rock work, not just “tick a bucket-list climb.”
- Flexible schedule: You can handle an early start or a longer day if your guide suggests it for better shade or quieter conditions.
Situations where you may want to wait
- Very limited time in Utah: If you only have a single day near Zion, a broader scenic visit or one of the Utah National Parks Tours from Salt Lake City may fit better than committing to a climb.
- Major fear of exposure: If you struggle on narrow walkways or tensed up on every balcony, spending a day on vertical terrain may not be enjoyable yet.
- Recovering from injury: If your doctor has not yet cleared you for hiking or upper body effort, focus on low-impact sightseeing this trip.
If you read the “good signs” list and feel mostly aligned, you are in a solid place to start planning a guided outing.
What You Need Before You Go: Fitness, Skills, and Gear
Your guide will bring technical equipment if you book guided rock climbing lessons in Zion for beginners with gear included, but you still need your own layers, footwear, and basic stamina. Think of it as a partnership. They handle safety systems and route choice, you arrive ready to move and learn.
Physical preparation in the weeks before
You do not need to be an elite athlete. Moderate, consistent movement matters more than intensity. Aim for activities that mimic what the day will feel like.
- Trail time: Walk or hike on uneven ground two to three times per week, even if it is just local hills or park paths with stairs.
- Simple strength: Add bodyweight squats, wall pushups, and light core work two times per week to build stability.
- Gentle mobility: Spend five minutes after each session stretching calves, hips, and shoulders to help you feel looser on the wall.
Useful skills to practice in advance
You can absolutely show up as a total beginner, but a little pre-trip practice will save time and boost confidence.
- Basic belay language: Look up standard commands like “On belay,” “Climbing,” and “Take,” and say them out loud until they feel natural.
- Gym experience if available: If you live near an indoor facility, try a session or two on top rope. Focus on trusting your feet rather than pulling with your arms.
- Listening under stress: Practice following short sets of instructions in other situations, for example learning a new gym machine. On the wall, being able to listen and respond calmly matters more than raw strength.
Personal gear checklist
Even when technical items are included, you are responsible for your clothing, hydration, and small comfort items. Pack light but intentional.
- Footwear: Closed-toe shoes with traction for the approach. If you have climbing shoes and your guide says they are appropriate, bring them too.
- Layers: Breathable base layer, light insulating layer, wind or sun-protective outer layer. Mornings can feel cool, middays hot.
- Sun protection: Hat, sunglasses, and broad-spectrum sunscreen. Sandstone can reflect light and intensify the exposure.
- Water and snacks: A full bottle or hydration bladder and calorie-dense food that you know your stomach handles well.
- Small daypack: Just large enough for water, layers, and snacks. A lower-profile pack is easier to wear while scrambling.
You found a hidden promo code!
Use code WOWBLOG at checkout and get 10% OFF any tour!
Limited time offer. Book now and save!
Browse ToursStep-by-Step: What a Typical Guided Climbing Day Looks Like
Guides and routes vary, but most first-time days in Zion follow a loose sequence. Understanding the flow makes the morning less overwhelming and keeps you focused on learning instead of wondering what comes next.
Step 1. Pre-trip contact and meeting plan
Ahead of your date, your guide will confirm start time, meeting point, expected temperatures, and what they provide. This is when you tell them about any injuries, phobias, or schedule constraints.
- Action: Reply to emails or messages with honest details about your fitness and experience, even if that experience is “none.”
- Check: Make sure you know how long the outing lasts so you do not stack another intense hike or long drive immediately afterward.
Step 2. Gear fit and safety briefing
Once you meet up, you will go through helmets, harnesses, and shoes if provided. Your guide will walk you through belay commands, how the rope is managed, and what they expect from you.
- Action: Ask them to adjust your harness and helmet until they feel snug but comfortable. Do not accept “good enough” if something pinches or slides.
- Check: You can repeat the basic commands back and understand what to do when you hear them.
Step 3. Approach hike and movement warm-up
The walk to the route can take anywhere from a few minutes to close to an hour, depending on the objective. This is usually at an easy pace with stops for scenery and water.
- Action: Use this time to notice how your shoes feel on rock and sand, and ask questions about the walls around you.
- Check: You can hold a conversation while walking. If you are gasping, mention it so pace or route choice can be adjusted.
Step 4. First climbs and skill building
Your first routes will likely be shorter and friendlier than what you saw in photos. The goal is to learn systems, trust the rope, and find your rhythm, not to sprint up a classic on your first try.
- Action: Focus on quiet feet and straight arms. Push from your legs and stand up on footholds rather than pulling in with bent elbows.
- Check: You feel safe when you sit in the harness, and you understand exactly what to do when you are ready to come down.
Step 5. Midday pacing and route choices
As the day warms and you gain confidence, your guide may choose different lines for shade, variety, or easier descents. Communication stays constant, even as the terrain changes.
- Action: Share honestly how your body feels at each break. Tired is fine, pain or dizziness is not.
- Check: You still feel mentally sharp enough to double-check systems and listen to instructions.
Step 6. Wrap-up, hike out, and debrief
After the final climb, you will pack gear, hike back, and have time to reflect. This is where small lessons often sink in.
- Action: Ask what you did well and what to practice before your next outdoor day.
- Check: You leave understanding at least one or two specific skills you improved, such as smoother footwork or better communication.
How to Know You Are Properly Prepared: Concrete Success Signals
Instead of hoping you are ready, use simple checks. If you can say “yes” to most of these, you are in a good place for a rewarding outing.
Readiness checklist the night before
- Packing complete: Clothing, snacks, water, personal medication, and identification are in your daypack by evening, not tossed together at dawn.
- Hydration started: Your urine is light in color before bed, which indicates you are not starting the day already behind on fluids.
- Route expectations clear: You know roughly how long the day lasts and whether there is a chance of exposure that might challenge you.
Morning-of confidence indicators
- Solid breakfast: You have eaten something with protein and carbohydrates, not just coffee.
- No gear mysteries: You know which items the guide is bringing and which are yours, with no assumptions either way.
- Calm excitement: You may be a bit nervous, but you also feel curious and eager to learn.
Table: Preparation level snapshot
| Area | Well prepared | Needs work |
|---|---|---|
| Fitness | Hiking 3–5 miles weekly on varied terrain feels fine | Out of breath after a single mile on flat ground |
| Knowledge | Familiar with basic commands and harness fit | Never seen a harness or belay setup before |
| Logistics | Meeting time, place, and day length are written down | Still unsure where to meet or how long you will be out |
What If Something Goes Wrong? Smart Fallback Paths
Even with good preparation, real life still happens. Weather shifts, nerves spike, or a route feels scarier than expected. Planning simple fallback options keeps trouble from turning into a crisis.
If nerves hit harder than expected
- Scale the objective: Ask to stay on shorter single-pitch climbs instead of committing to longer multi-pitch lines.
- Switch roles: Spend more time belaying under close supervision. Many people relax when they feel how secure the rope system is from the ground.
- Reset on the ground: Take a longer break, hydrate, and reset your breathing before deciding whether to continue.
If weather or conditions deteriorate
Utah’s desert can change quickly, especially in shoulder seasons. Your guide will watch forecasts, but you can support smart decisions.
- Be flexible: Accept changes in route choice or an earlier finish if sun, wind, or rain makes the original plan less safe.
- Ask questions: If your guide proposes backing off, ask why. Their explanation will teach you how to read similar situations in the future.
If fitness is lower than expected
- Shorten the day: Suggest focusing on a smaller area instead of pushing for extra routes when you already feel drained.
- Adjust pace: Request more frequent short breaks on the approach or descent.
- Learn from it: Use the experience to plan better conditioning before your next visit.
Comparing Guided Climbing Days with Other Utah Experiences
Some visitors try to fit everything into one trip: rope days, big hikes, scenic drives, and sunrise photos. It helps to understand how a guided climbing day fits beside other options that start from city hubs like Salt Lake City.
| Experience type | Main focus | Physical demand | Logistics handled |
|---|---|---|---|
| Guided climbing day in Zion | Learning rope systems and movement on real rock | Moderate to high, depending on route | Technical gear and safety systems managed by guide |
| Utah National Parks scenic tour | Key viewpoints, short walks, and photo stops | Low to moderate, mostly walking | Transport, route, and commentary managed by guide |
| Utah ski resort day trip | Full day of skiing or riding near Salt Lake City | Moderate to high, sustained activity | Winter driving, resort navigation, and tips managed by driver-guide |
If you want to mix experiences, many travelers spend a day or two on scenic tours or a ski day near Salt Lake City, then add a climbing or hiking objective closer to Zion later in their itinerary.
Actionable Tips to Make Your First Guided Day Smoother
Small decisions before and during the outing have a big impact on how enjoyable it feels. Here are targeted tips drawn from common beginner pain points.
- Trim your pack: Lay everything out and remove duplicates or “just in case” items you will not realistically use. A lighter pack makes every move feel easier.
- Practice knot awareness: Even if you will not be tying anything, look at pictures of common knots so they do not feel completely foreign when your guide mentions them.
- Set one learning goal: For example, “I want to trust my feet more” or “I want to learn to communicate clearly.” Share it with your guide at the start.
- Protect your skin: Keep sunscreen and lip balm easily accessible. Apply them at the car and again at lunch, not only when you already feel burnt.
- Respect your limits: There is no prize for pushing through real pain. Tapping out one climb earlier often leaves a better memory than forcing a final route when you are done.

Practical Scenarios: What a First Day Might Actually Feel Like
Case 1. Gym climber, first time on sandstone
A traveler who climbs indoors twice a week books a beginner-friendly day. They start a bit fast on the approach, then realize the sun and sand make it feel different from the gym. After two shorter warm-up climbs, the guide helps them adjust foot placement and trust the rope on slightly longer lines. By mid-afternoon they are tired but comfortable, and they end the day practicing smooth descents and better breathing instead of chasing one more grade.
Case 2. Confident hiker, brand new to rope systems
Someone who hikes often but has never worn a harness joins a guided day. The approach feels easy, but the first time they lean back on the rope they freeze. The guide spends extra time on the ground explaining how the system holds and lets them sit in the harness a few times before going higher. Later routes stay short, and the focus shifts to enjoying the views rather than climbing as high as possible. The guest leaves knowing that a second outing will feel completely different now that the initial fear is handled.
How Guided Climbing Fits with Other Zion and Utah Activities
Many visitors pair a rope day with other guided options. Someone arriving from Salt Lake City might join one of the zion national park tours from salt lake city for broad orientation, then schedule a climbing day after they have seen the canyon from the road and short viewpoints. Others use a Utah ski resort day trip earlier in the week, then head south when legs have adapted to consistent activity.
Travelers focused on iconic hikes sometimes choose a guided Angel’s Landing sunrise hike from Springdale with permit help and add a rope day later in the trip when bodies have adjusted to early starts and exposure. Photographers may opt for a private day tour from salt lake city to zion for sunrise photography and then dedicate a separate day to climbing so they can give each experience full attention.
Research on outdoor learning consistently shows that clear expectations, realistic goals, and stepwise progression lead to better skill retention and more positive memories than single, high-stress “once in a lifetime” pushes.
Common First-Timer Mistakes to Avoid
Knowing what often goes wrong helps you sidestep the same traps.
- Ignoring hydration the day before: Showing up already dehydrated makes the heat feel harsher and increases fatigue.
- Brand new shoes or pack: Breaking in gear on a big day is a recipe for blisters and sore shoulders.
- Overstuffed itinerary: Planning a huge hike or long drive right after your climbing day leaves no room for delays, weather, or simple tiredness.
- Silence about fear: Guides expect nerves. If you pretend you are fine when you are not, they cannot adjust the plan or pace.
Conclusion
Getting ready for your first guided climbing day in Zion is less about buying gear and more about honest self-assessment, simple conditioning, and clear communication with your guide. When you know the gate criteria, prepare your body and kit thoughtfully, and walk through the day step by step, the experience shifts from intimidating to deeply rewarding. Use the checklists and scenarios above to tune your expectations and packing list, and give yourself permission to scale the objective if nerves, weather, or fatigue demand it. With that groundwork in place, a guided day becomes an unforgettable way to experience the canyon from a very different angle, not a stressful unknown. If you want help weaving climbing into a broader Utah itinerary, MateiTravel can support you in choosing the right guided experiences and timing.
How fit should I be for a first guided climbing day in Zion?
You should comfortably walk 3 to 5 miles on uneven terrain and still feel functional afterward. If a short flat walk leaves you exhausted, build more conditioning before booking.
Do I need my own harness and helmet for a beginner guided day?
Not usually, since many beginner-focused outings include technical gear. You are still responsible for your clothing, footwear, pack, water, and food.
What should I tell the guide before my climbing day?
Share your hiking background, any previous rope experience, injuries, and specific fears such as exposure. Honest details help them match objectives to your comfort level.
Can I combine a guided climb with other Zion activities in one day?
It is better to dedicate the day to climbing and keep bigger hikes or long drives for separate days. That leaves room for changing conditions and normal tiredness.
How do I know if I am mentally ready for exposure on real rock?
If viewpoints and balcony edges feel manageable, some nerves on a wall are normal. If you freeze on every height, consider starting with easier hikes or viewpoints first.
What is the most common packing mistake for first-time climbers in Zion?
Bringing an overloaded backpack with duplicate clothing and extra items “just in case.” A lighter, intentional kit makes movement and balance much easier.
How far in advance should I start preparing physically?
Three to six weeks of regular walking and simple strength work is ideal. Even two consistent weeks are better than doing nothing and hoping it works out.
What should I focus on learning during my first guided day?
Prioritize clear communication, trusting the rope, and using your legs more than your arms. That foundation will make every later outing more enjoyable.

 Bonneville Salt Flats – Journey to the Edge of the World
 Bonneville Salt Flats – Sunset Adventure of the White Desert
 Antelope Island – Wild Heart of the Great Salt Lake Adventure
 Salt Lake City – The City of Zion. Historical Interactive Walking Tour
 Antelope Island Sunset Wildlife Expedition – Great Salt Lake Odyssey