Arches Night-Sky Walks: Long-Exposure Basics Before Booking
May 8, 2026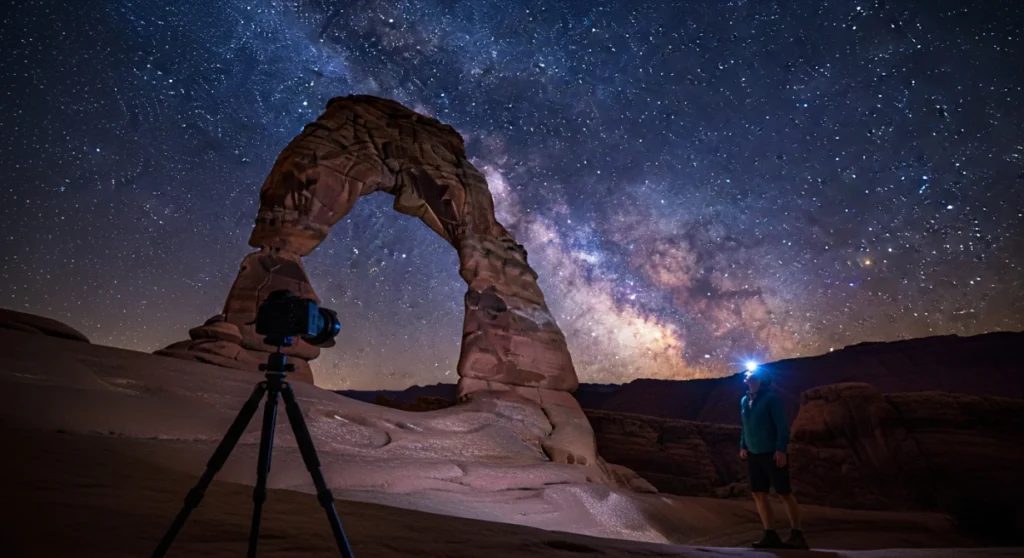
Book an Arches night-sky walk if you can use manual mode and a tripod in the dark. The biggest factors are moon timing, legal lighting limits, and a simple repeatable long-exposure workflow.
People often book a night outing in Arches expecting the stars alone to do all the work, then realize too late that long exposure is less about luck and more about control. That matters here because Arches is prized for dark skies, but the same darkness that makes the sky impressive also exposes every shaky hand, rushed setup, and bad moon-timing choice.
An Arches night-sky walk sits in the broader category of guided park photography and stargazing experiences. It helps travelers who want strong images without guessing through camera basics on the trail, and it matters most when you are deciding whether to join a guided outing, what skills you should have first, and what conditions make the booking worthwhile.
If you are comparing guided options as part of a larger Utah trip, it also helps to think beyond one evening. Travelers who want logistics support across several parks often start with Utah National Parks tours, especially when they prefer round-trip transport from Salt Lake City and do not want to manage reservations, parking, and route planning on their own.
Should you book an Arches night-sky walk before learning long-exposure basics?
Yes, but only if your goal matches the format of the outing. A guided walk works best when you want help with timing, composition, and field workflow, not when you expect the guide to fix every camera mistake for you.
Long exposure is simple in principle and unforgiving in practice. You need enough familiarity with your camera to change settings in the dark, mount it steadily, and understand why one frame failed before the group moves on.
A guided experience makes the most sense for travelers who already know the location is the hard part. In Arches, darkness, terrain, and timing around moon phase matter as much as camera enthusiasm.
| Booking situation | Good fit for a night-sky walk | Better to wait and practice first |
|---|---|---|
| Camera handling | You can find manual mode and adjust exposure settings without searching through menus for long | You have never used manual controls and rely entirely on automatic shooting |
| Physical expectations | You are comfortable with a short walk, standing still, and carrying a tripod | You want a casual stroll with no pauses for setup or repeated framing |
| Image goals | You want cleaner night images and are willing to troubleshoot | You expect instant results with no learning curve |
| Trip planning | You want local guidance as part of a broader Utah itinerary | You have not yet checked whether a night outing fits your overall schedule and energy level |
What should you prepare before booking?
You should prepare three things first: your timing, your handling skills, and your expectations for group pace. If any of those are off, even a well-run outing can feel frustrating.
The most important timing variable is moonlight. Arches has its darkest skies during a new moon or when the moon is below the horizon, and even a thin crescent can wash out fainter stars and make the Milky Way harder to see.
The darkest skies at Arches are during a new moon or when the moon is below the horizon, and even a thin crescent moon can make it harder to see faint stars or the Milky Way.
Your second preparation task is purely practical. Night photography at Arches is built around manual mode and a tripod, because blur and exposure errors are far more common than people expect once they leave daylight shooting.
- Required skill: Know how to switch to manual mode and change shutter speed, aperture, and ISO without stopping the whole group.
- Required gear: Bring a tripod, because long exposures magnify even tiny movement.
- Required expectation: Accept that some frames will fail at first and need quick correction.
- Optional accelerator: Practice one dark backyard or hotel-parking-lot setup before the trip so button layout feels familiar.
If you are building a larger itinerary, look for trips that simplify daytime logistics too. For many visitors, Utah national parks tours from Salt Lake City make sense because transport, viewpoints, and walking level are organized in advance, which leaves more attention for the special timing a night outing requires.
You found a hidden promo code!
Use code WOWBLOG at checkout and get 10% OFF any tour!
Limited time offer. Book now and save!
Browse ToursWhat park rules matter for long-exposure photography in Arches?
The rule that surprises people most is simple: you cannot use artificial light to illuminate rock formations or landscapes for your shot. That changes how you plan composition, because you must work with available natural light instead of adding your own dramatic foreground glow.
Using artificial light sources to illuminate landscapes, rock formations, or other park features during night photography is prohibited in Arches National Park.
This matters for booking because some travelers imagine a workshop-style session with lit foregrounds and stylized effects. In Arches, legal and respectful night work means building your frame around the natural contrast between sky brightness, terrain shape, and the darkness your eyes slowly adapt to.
Arches was certified as an International Dark Sky Park in 2019, which is one reason night visits are so appealing. That designation supports the core experience, but it also means preserving darkness is part of the point, not something to overpower with extra lighting.
How do you execute a basic long-exposure workflow on the walk?
The basic workflow is: stabilize, compose, set manual exposure, take a test frame, then adjust one variable at a time. That sequence prevents the most common field mistake, which is changing several controls at once and not knowing what fixed or ruined the image.
- Stabilize first: Set the tripod on firm ground and check that the camera is secure before you frame anything.
- Compose with a foreground shape: Use an arch, rock edge, or skyline silhouette to give the sky context rather than shooting only empty stars.
- Switch to manual mode: Arches specifically recommends manual mode for night photography because the camera will not reliably choose the exposure for you in very dark conditions.
- Start with a test frame: Take one image to see whether stars are visible, the foreground is readable enough, and blur is present.
- Adjust one control: If the frame is too dark, alter shutter speed, aperture, or ISO one at a time so you can read the effect clearly.
- Review at full zoom: Check sharpness on the screen instead of trusting the small preview.
- Repeat quickly: Save time by keeping the composition fixed until exposure looks usable, then refine angle or foreground balance.
The National Park Service guidance is straightforward here. For night sky images at Arches, use manual mode, rely on a tripod to prevent blur during long exposures, and experiment with shutter speed, aperture, and ISO to control how much light reaches the sensor.
| If your test frame shows this problem | Likely cause | Best next adjustment |
|---|---|---|
| Stars look dim and the scene feels empty | Not enough light captured | Change one exposure setting to allow more light, then retest |
| Whole frame looks soft | Camera movement during exposure | Recheck tripod stability before changing exposure |
| Foreground overwhelms the sky | Composition is weighted too low or too bright naturally | Raise the frame or choose a simpler rock silhouette |
| Sky detail seems washed out | Moonlight or overly bright scene conditions | Reassess timing and accept that conditions may limit faint-star visibility |
Two realistic booking scenarios
A traveler on a one-day guided Arches night-sky photography walk focusing on long exposure techniques usually gets the most value when they already know their controls and want location help. In that case, the guide’s role is less about teaching what ISO means and more about choosing stop timing, helping with framing, and keeping the session moving.
A different traveler joins after never practicing manual shooting and spends most of the evening hunting through settings. The likely outcome is not a bad trip, but a thin result: a few usable frames, more frustration than expected, and the feeling that the location was better than the photographs.
How do you verify that your setup and results are good enough during the outing?
You verify quality by checking three things on every serious frame: sharpness, sky visibility, and foreground intent. If those are working, you are on track even before you worry about making the image impressive.
Sharpness comes first because no later edit can rescue motion blur from a bad long exposure. Then confirm that stars are visible enough for your goal and that the rock form reads as a deliberate element instead of a random black mass.
- Success signal: The camera remained steady and the image looks crisp when reviewed closely.
- Success signal: The sky shows distinct stars rather than a muddy gray field.
- Success signal: The landform contributes shape or scale without competing awkwardly with the sky.
- Success signal: You can repeat the result on the next frame without guessing what settings changed.
If you can produce two or three similar frames in a row, your workflow is stable. That consistency matters more on a guided outing than chasing one lucky image, because group movement and limited dark-sky windows reward repeatable technique.

What should you do if a step fails on the walk?
If a step fails, do not restart from scratch or change everything at once. Use the simplest fallback for the specific failure, then retest immediately.
Most failures fall into four buckets: blur, underexposure, poor composition, or bad sky conditions. The first three are fixable in the field, while the last one may require accepting the night you have rather than the night you wanted.
- Blurred frame: Re-seat the tripod, confirm nothing shifted, and shoot the same composition again before touching exposure settings.
- Too-dark image: Increase light capture by adjusting one manual exposure variable and compare to the prior test frame.
- Weak composition: Simplify the foreground and use a stronger silhouette instead of forcing too many rock elements into one frame.
- Moonlit or hazy sky: Lower your expectations for faint-star detail and focus on cleaner foreground-plus-sky balance.
- Group pace feels fast: Ask early whether you should stay with one setup rather than chasing multiple compositions.
This is also where small-group formats help. In small group tours of Utah national parks, asking questions is easier and field corrections are usually more realistic than in a large bus-style stop, especially when everyone is working in darkness.
What practical recommendations make a booking more worthwhile?
The best practical move is to treat the booking as a field session, not a miracle fix. Travelers get more from it when they arrive with a basic repeatable process and use the guide’s time for location judgment and refinement.
- Book around moon conditions: Prioritize dates near a new moon or when the moon will be below the horizon during your outing.
- Practice manual controls once before travel: Ten minutes of rehearsal in low light saves a surprising amount of on-trail confusion.
- Use one composition until it works: Resist constant repositioning during the first part of the session.
- Plan the wider trip honestly: If you are already doing several parks, choose guided logistics where transport and pacing reduce decision fatigue.
- Ask about walking level before confirming: Night outings feel longer when you are carrying a tripod and waiting between frames.
For travelers comparing options across the state, the best tours of Utah national parks are often the ones that remove friction rather than add activities. That is especially true when a night experience is one piece of a larger route and you would rather spend energy on shooting than on navigation, parking, and timing.
An Arches night-sky walk is worth booking when you want guided help with timing, composition, and field decisions, and when you already understand the basics of manual shooting. The essentials are straightforward: go when moonlight is favorable, use a tripod, work in manual mode, and adjust one exposure setting at a time. Verify each frame for sharpness, visible stars, and a purposeful foreground, then use simple fallback fixes instead of random changes. If you want a broader Utah trip built around easier logistics, MateiTravel’s guided park options can complement a focused night outing.
Do I need to know manual mode before joining an Arches night-sky walk?
You do not need advanced skills, but you should be able to find and change manual settings without a long delay in the dark.
Why does moon phase matter so much for night photography in Arches?
More moonlight reduces visibility of fainter stars and can make the Milky Way harder to see. Darker timing usually gives a stronger sky result.
Can I light up rocks or arches with my own artificial light?
No. Artificial light used to illuminate landscapes or rock formations is prohibited in Arches National Park.
What is the most important piece of gear for long exposure?
A tripod is the key item because camera movement is one of the fastest ways to ruin a night frame.
How can I tell if my image is good enough on location?
Zoom in to confirm sharpness, check that stars are clearly visible, and make sure the foreground shape looks intentional rather than accidental.
What should I fix first if my photo looks bad?
Start with stability. If the frame is blurred, reset the tripod and repeat the shot before making other changes.
Are guided Utah park trips useful if I also want a night-sky experience?
Yes, especially if you want transport and daytime logistics handled so your attention stays on the timing and demands of the evening shoot.

 Antelope Island Sunset Wildlife Expedition – Great Salt Lake Odyssey
 Bonneville Salt Flats – Sunset Adventure of the White Desert
 Antelope Island – Wild Heart of the Great Salt Lake Adventure
 Bonneville Salt Flats – Journey to the Edge of the World
 Salt Lake City – The City of Zion. Historical Interactive Walking Tour