How to Photograph Delicate Arch Without Crowds: Timing, Routes, and Pro Tips
Dec 14, 2025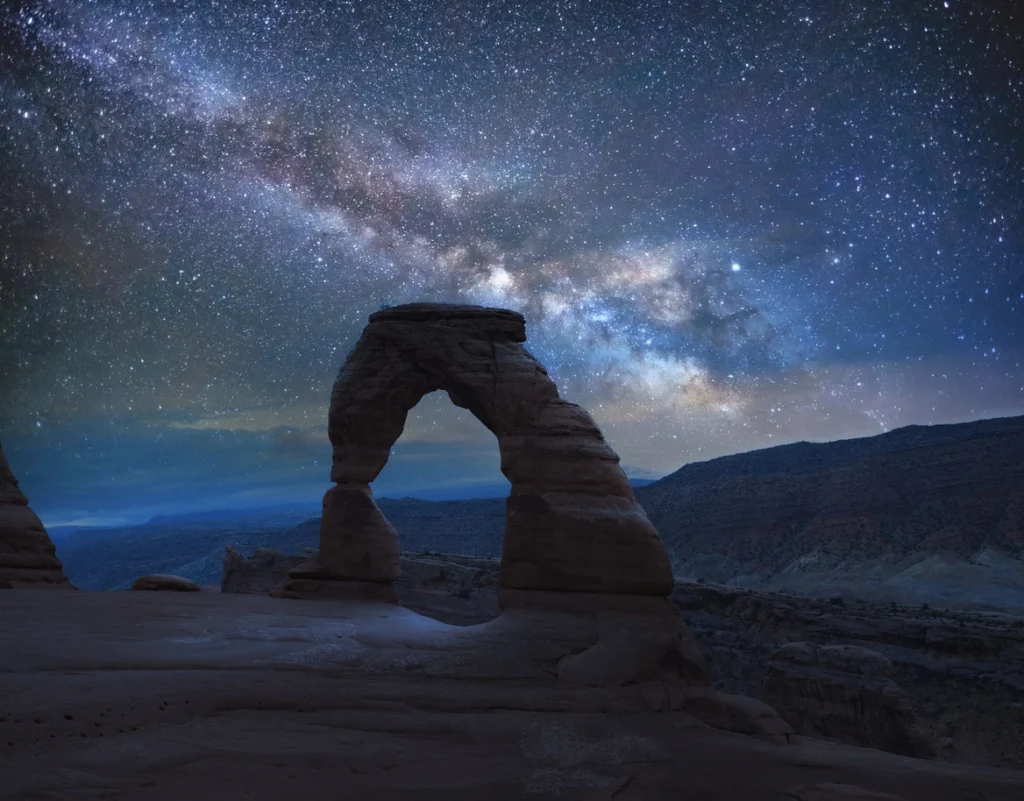
To photograph Delicate Arch without crowds, visit at sunrise or late evening on a weekday, preferably in winter or shoulder seasons. Start the hike early, use upper or lower viewpoints with a telephoto lens, and adapt your composition. Long exposures, flexible positioning, and expert local guidance from MateiTravel all improve your odds of clean, iconic shots.
How to photograph Delicate Arch without crowds
If you want to photograph Delicate Arch without crowds, aim for sunrise or late evening on a weekday, visit in winter or shoulder seasons, start hiking earlier than most visitors, and use alternative viewpoints or longer lenses to frame out people. Combine smart timing with patience, respectful positioning, and solid photo technique for clean, iconic images.
More travelers visit Arches National Park every year, which makes getting a quiet shot of this famous sandstone arch increasingly challenging. From my experience working with travel photographers and tour operators, the difference between a chaotic snapshot and a portfolio-worthy image usually comes down to planning, timing, and knowing a few local tricks. In this guide, you will learn when to go, which routes to choose, how to compose around people, and how a guided tour with local experts can help you photograph Delicate Arch without stress.
🌄 When is the best time to photograph Delicate Arch without people?
Sunrise vs late evening: which is quieter?
According to the National Park Service, visitor numbers at Delicate Arch are lowest around sunrise and during the late evening, especially on weekdays. They state that, “For fewer crowds, hike to Delicate Arch at sunrise or late evening, especially on weekdays.”
Sunrise usually brings the smallest groups, since fewer travelers are willing to hike in the dark and get up this early. Evening, roughly an hour before sunset, is still relatively quiet compared to midday but can be busier because many visitors stay for the warm light on the arch.
Weekdays, seasons, and holidays
In short, combining off-peak times in the day with off-peak days in the week gives you the best odds of an empty scene. Aim for Monday through Thursday if possible and avoid long weekends, school vacations, and major holidays in the United States.
Photographers consistently report that winter and the shoulder seasons feel calmer, while still offering beautiful light. As National Geographic Travel notes, “Winter mornings or early spring evenings offer quiet vistas and perfect light for Delicate Arch photography.”
Best months and typical conditions
Each season has trade-offs that matter for both crowds and your images. Winter and early spring bring softer light and fewer people, while summer often means harsh sun, higher temperatures, and heavier visitation.
| Season | Crowd level (typical) | Light and conditions | Best time of day |
|---|---|---|---|
| Winter (Dec–Feb) | Low | Soft light, possible snow, cold | Sunrise and late afternoon |
| Spring (Mar–May) | Medium | Pleasant temperatures, variable skies | Sunrise, golden hour |
| Summer (Jun–Aug) | High | Harsh midday light, very hot | Early sunrise, late evening |
| Fall (Sep–Nov) | Medium to low | Stable weather, warm tones | Sunrise, sunset |
How early should you start the hike?
The hike to the main viewpoint is roughly 1.5 miles (about 2.4 km) one way with some elevation gain. Most visitors take 45–60 minutes. To arrive before the bulk of the crowd, plan to reach the arch at least 30–45 minutes before sunrise or one hour before sunset.
Bottom line, what matters most is building a buffer into your schedule. Start earlier than you think you need, especially if you are carrying camera gear or traveling with a group that hikes at different speeds.
You found a hidden promo code!
Use code WOWBLOG at checkout and get 10% OFF any tour!
Limited time offer. Book now and save!
Browse Tours🚶♂️ Routes and viewpoints that help you avoid crowds
Main trail to the bowl under Delicate Arch
The classic route leads to the natural sandstone “bowl” directly beneath Delicate Arch. This is where most people gather for iconic shots. It is also where crowds are most visible in your frame, especially during peak season.
If you want the classic postcard angle without people, you need either exceptional timing, patience, or a willingness to shoot before the main wave of visitors arrives.
Upper viewpoint with a telephoto lens
Experienced landscape photographers often choose the official upper viewpoint to minimize crowds in their compositions. As Outdoor Photographer Magazine explains,
“For a different angle and fewer people in your frame, use the upper viewpoint with a 70–200mm lens.”
From this vantage point, you are farther away, so individual people look much smaller and easier to crop out. A telephoto zoom lets you compress the scene and isolate the arch against the La Sal Mountains or the sky.
Lower viewpoint and creative framing
The lower viewpoint is easier to access and usually has fewer serious photographers competing for prime spots. You are farther from the arch than on the main trail, but that distance can inspire more creative compositions instead of the standard shot.
Use foreground rocks, leading lines, or silhouettes in the distance. This position works well if the bowl is packed but you still want a peaceful sense of space in your photo.
Choosing the right route for your priorities
The key takeaway is that you should match your route to your creative goal. If you absolutely want the classic up-close image, prepare for the sweat and patience of the main trail. If you care more about a crowd-free frame than a traditional angle, upper and lower viewpoints give you better odds.
| Viewpoint | Crowd exposure in frame | Lens recommendation | Difficulty |
|---|---|---|---|
| Main bowl | High | 24–70mm standard zoom | Moderate hike |
| Upper viewpoint | Low to medium | 70–200mm telephoto | Short hike |
| Lower viewpoint | Low | 24–105mm zoom | Easy walk |
📸 Camera gear and settings for crowd-free images
Lenses that make people disappear
A standard zoom, such as a 24–70mm lens, works well at the main bowl and allows for both wide environmental shots and tighter crops. When crowds are heavy, switching to a longer focal length is often the fastest way to reduce visible people in the frame.
Telephoto zooms between 70–200mm let you exclude busy foregrounds and pick cleaner angles. They are particularly useful from the upper viewpoint or when you need to compress the scene so that any remaining visitors are small and unobtrusive.
Tripods, filters, and exposure settings
Low light at sunrise and late evening favors solid technique. A stable tripod helps you shoot at lower ISO, which keeps noise under control and detail crisp. If you want silky skies or to blur moving people just enough that they are not distracting, a neutral density filter can extend your shutter speed.
For a starting point, try aperture around f/8–f/11 for depth of field, a low ISO between 64 and 200, and adjust shutter speed as the light changes. Always check your histogram so the bright rock does not blow out.
Long exposures to blur or erase people
When a few hikers cross your composition, a long exposure can turn them into faint streaks or make them nearly invisible. This works best when people move through the frame instead of standing still on the horizon line under the arch.
To summarize, use a tripod, a small aperture, and potentially a dark filter to slow the shutter. The result is a clean, almost crowd-free look even if there was a steady trickle of visitors while you were shooting.
Backup options: panoramas and tight crops
Sometimes the bowl never really clears. In that case, think beyond the classic single frame. Vertical panoramas let you include the arch and sky while cropping out most of the spectator area.
Tight crops of the arch’s curves or details against the sky also avoid the flat ledge where people stand. These shots feel more intimate and unique, and they are easier to get on a busy evening.
✅ Pros and cons of trying to avoid crowds at Delicate Arch
Advantages of shooting at off-peak times
- Cleaner compositions You get more frames without people, tripods, or bags in the background, which keeps attention on the rock formation and the landscape.
- Better light Sunrise and late evening usually bring softer, warmer light and more dramatic color than the harsh middle of the day.
- Calmer experience Fewer people mean less noise and less pressure, so you can take your time with settings, composition, and creative variations.
- Easier logistics Parking and trail congestion are usually lighter, which reduces stress and wasted time.
Limitations and trade-offs you should accept
- Early or late hiking You may need to walk in the dark with a headlamp and deal with chilly or very cold temperatures in winter.
- Weather risk Off-peak seasons can bring snow, ice, or unpredictable weather that limits access or comfort.
- Fewer services In quieter months, some nearby restaurants or services may have shorter hours.
- Uncertain results Even with careful planning, you cannot fully control how many others decide to show up.
🧠 Common mistakes when trying to photograph Delicate Arch without crowds
Starting the hike too late
Many visitors underestimate the time required to reach the bowl and set up their gear. They arrive just as the best light peaks and the viewing area is already full, which limits where they can stand and how freely they can compose.
Plan backward from the time you want to shoot. Add the hiking time, parking time, and a buffer for traffic. Then set your departure based on that plan, not on guesswork in the hotel room.
Ignoring weekdays and seasons
Some travelers only think about time of day and forget that weekends and summer holidays dramatically increase visitor numbers. This leads to frustration when a beautiful golden hour is filled with dozens of people.
Whenever possible, target Monday through Thursday and choose winter, late fall, or early spring. Even a single shift from Saturday evening to Tuesday evening can change the crowd density.
Standing in a rigid spot without adapting
Another frequent error is staying locked in one location, hoping everyone will leave your frame. Meanwhile, small shifts in position or angle would solve most of the problem.
If someone stands exactly where you want to compose, move a few steps along the bowl, lower your camera height, or adjust your focal length. Micro adjustments often clear the horizon line where heads tend to appear.
Bringing the wrong lens or no tripod
Arriving with only a wide-angle lens on a crowded evening means you will include the entire ledge packed with visitors. Without a tripod, you may also struggle with sharpness in low light.
Always pack at least one standard zoom and one telephoto option, plus a stable support. These items weigh less than the disappointment of missing your shot after a long hike.
Forgetting trail etiquette and safety
In the rush to secure a prime position, some photographers step too close to edges, block the trail, or ignore other visitors’ space. This creates tension and can be dangerous.
Stay aware of your surroundings, keep gear organized, and share the best spots. Respectful behavior makes it easier for everyone to take turns and leave with good images.
🧰 Practical tips to get crowd-free images of Delicate Arch
Seven actionable recommendations
- Arrive early Time your hike so you reach the arch at least 30–45 minutes before sunrise or one hour before sunset, with extra buffer.
- Choose your weekday Target Monday through Thursday and avoid major holidays to benefit from lower visitation.
- Use alternative viewpoints If the bowl is crowded, move to the upper viewpoint and work with a telephoto lens to reduce visible people.
- Pack smart gear Bring a tripod, a standard zoom, and a telephoto zoom so you can adapt to changing light and crowd patterns.
- Consider long exposures Use slower shutter speeds to blur or minimize moving people when the flow never fully stops.
- Stay flexible Be ready to change your angle, lens, or composition instead of waiting for the perfect empty scene that may never come.
- Plan with local insight Consult guides or tours that know real-time patterns for parking, trail conditions, and group behavior.
Two real-world style scenarios
Imagine a solo photographer visiting in early March. She sets out before dawn on a Tuesday, reaches the bowl 40 minutes before sunrise, and finds only a handful of others. Using a tripod and a 24–70mm lens, she captures the first soft light on the arch with a clean foreground. As more visitors arrive, she switches to tighter compositions and a few vertical panoramas to keep people out of the frame.
Now picture a small group arriving on a Friday evening in July. The bowl is already busy, so they walk to the upper viewpoint with a 70–200mm lens. From there, they frame the arch against distant mountains. Most people are invisible at this distance and any that remain appear as tiny, manageable elements in the scene.
Incorporating MateiTravel guidance
Guided trips can save you time and stress when you do not know the area. MateiTravel works with local, experienced guides who regularly visit Arches National Park and understand how crowd patterns change through the year.
Their Utah national parks itineraries include dedicated time at Delicate Arch, with recommendations for departure times and suggested gear so you do not have to guess. In brief, leaning on local expertise greatly increases your chances of coming home with the images you imagined.
Recommended tours for timing and logistics
If you prefer not to drive yourself or manage parking in the dark, a curated trip can be very convenient. Options like the Utah National Parks Tours may include guidance on when to schedule sunrise or late evening sessions at Delicate Arch.
For travelers short on time, single-day packages such as day tours in Utah help you combine several iconic viewpoints in one efficient schedule. They often use comfortable group transportation or private transfers, which makes early starts more manageable.
🧭 How MateiTravel can help you plan a quiet Delicate Arch shoot
Local guides who know real-world patterns
MateiTravel works with guides who live in Utah and spend much of their year inside national parks. They have first-hand knowledge of parking bottlenecks, sunrise timing, and how different seasons affect crowds and light.
Instead of relying solely on generic advice, you benefit from up-to-date, on-the-ground experience. That means less time guessing and more time shooting.
Custom and small-group itineraries
The company offers a variety of custom and signature tours across Utah. This flexibility allows you to prioritize photography, not just sightseeing. If Delicate Arch is your must-have subject, they can shape your schedule around optimal windows.
Small groups make it easier to adjust plans, wait a little longer at a promising viewpoint, or move quickly when the light changes. You are not just following a rigid checklist of stops.
Comfortable transport for early and late sessions
Early departures and late returns feel much easier when transportation is handled for you. MateiTravel uses comfortable vehicles for larger parties and can arrange dedicated transfers for smaller groups.
This matters more than it might seem. Well-timed transport means you spend your energy on creative decisions instead of navigating roads in the dark or searching for a parking spot at the last minute.
Why planning with experts improves your images
Bottom line, working with a specialist tour company turns a complex logistics puzzle into a smooth day in the field. You focus on composition and exposure while someone else tracks time, weather, and crowds.
When you combine this support with the tactics in this article, your odds of getting a crowd-free photograph of Delicate Arch improve dramatically, even as the park grows more popular every year.
🧩 Conclusion
Photographing Delicate Arch without crowds is absolutely possible if you pair smart timing with flexible technique. Sunrise or late evening on weekdays, especially in winter and shoulder seasons, give you the best conditions and the fewest people. Alternative viewpoints, longer lenses, and long exposures help you minimize anyone who does appear.
By avoiding common mistakes like late starts, weekend visits, and rigid positioning, you can turn a busy landmark into a serene, timeless image. Guided experiences with companies like MateiTravel add local insight, efficient transport, and tailored schedules that further stack the odds in your favor. The next step is simple. Choose your season, pick your time of day, and start planning your own quiet encounter with Delicate Arch.
Sources
— National Park Service, Arches National Park Visitor Guidance (2025)
— National Geographic Travel, Southwest Photography Feature (2025)
— Outdoor Photographer Magazine, Desert Landscape Tips (2025)
— MateiTravel Internal Tour Planning Notes (2025)
— Industry Report on US National Park Visitation Trends (2024)
FAQ
When is the least crowded time of day to photograph Delicate Arch?
The quietest windows are usually at sunrise and in the late evening, especially on weekdays. If you want a cleaner composition, reach the arch 30–45 minutes before sunrise or about an hour before sunset so you can set up before most visitors arrive.
Which season is best for avoiding crowds and getting good light?
Winter and the shoulder seasons of early spring and late fall balance lower crowds with soft, flattering light. Winter mornings and early spring evenings in particular tend to offer calmer conditions and more subtle color, as noted by major travel publications in 2025.
What is the easiest way to keep people out of my Delicate Arch photos?
Combine smart timing with lens choice and composition. Visit at sunrise or late evening on a weekday, then use a telephoto lens from the upper or lower viewpoints to crop out busy areas. Long exposures can also blur moving hikers so they are less noticeable.
How long does the hike to Delicate Arch take and how should I plan?
The main trail to the bowl is about 1.5 miles one way and usually takes 45–60 minutes. Plan backward from your desired shooting time, add trail and parking time plus a buffer, and start earlier than you think you need, especially if you are carrying camera equipment.
What gear should I bring to photograph Delicate Arch without crowds?
Bring a sturdy tripod, a standard zoom such as 24–70mm, and a telephoto zoom like a 70–200mm if possible. These lenses let you adapt to different viewpoints and crop out people, while the tripod helps with low light during sunrise and late evening sessions.
Is the upper viewpoint really better for avoiding people in the frame?
Yes, the upper viewpoint places you farther from the bowl where most visitors gather. With a 70–200mm lens, you can frame the arch tightly and make people appear very small or invisible, which is especially helpful during busier hours.
What common mistakes should I avoid when planning my shoot?
Typical errors include starting the hike too late, visiting only on weekends, bringing only a wide-angle lens, and refusing to move when someone blocks your composition. You can avoid these problems by planning for weekdays, packing flexible gear, and staying mobile at the viewpoint.
How can MateiTravel improve my chances of a crowd-free Delicate Arch photo?
MateiTravel uses local guides who understand seasonal and daily crowd patterns and can schedule sunrise or late evening visits accordingly. Their tours include comfortable transport, custom timing, and practical advice on gear and viewpoints, so you can focus your energy on creativity instead of logistics.
What should I do if the bowl is completely packed when I arrive?
If the main viewing area is full, head to the upper or lower viewpoints and switch to a longer lens. From there you can still create compelling images by compressing the scene, using creative framing, or capturing details like silhouettes and vertical panoramas that avoid the crowd.

 Bonneville Salt Flats – Sunset Adventure of the White Desert
 Antelope Island – Wild Heart of the Great Salt Lake Adventure
 Bonneville Salt Flats – Journey to the Edge of the World
 Salt Lake City – The City of Zion. Historical Interactive Walking Tour
 Antelope Island Sunset Wildlife Expedition – Great Salt Lake Odyssey