How to Photograph Red Rocks Without Blown Highlights on Utah Tours
Jan 28, 2026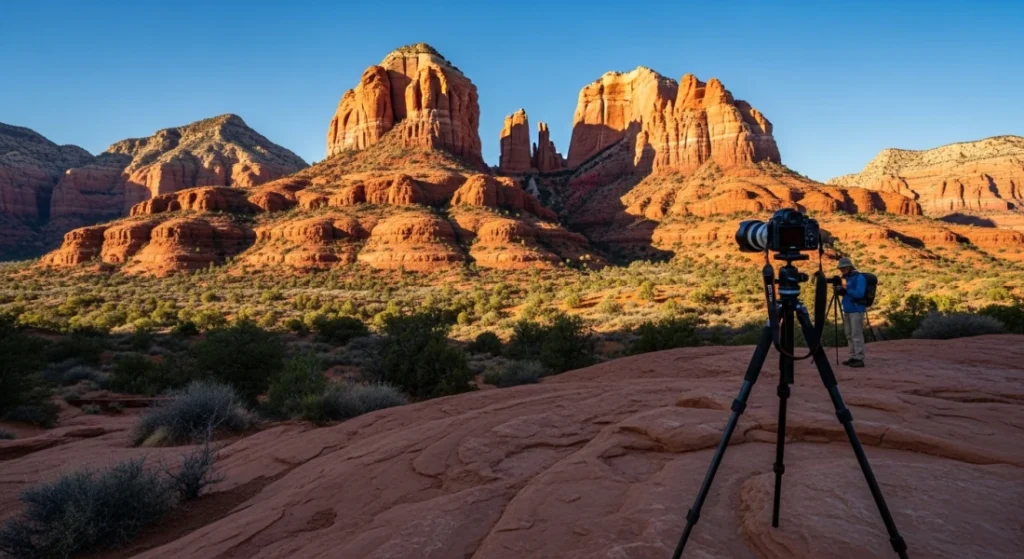
Expose for the brightest rock, use slight negative compensation, and rely on the histogram instead of the LCD. Time your shots for softer light and use details or shade when midday contrast is extreme.
Desert landscapes look simple at first glance. Blue sky, sun, and a wall of glowing rock. Then you get home, open your files, and discover half the cliff is pure white and the shadows are inky black. Photographing red rock country without destroying your highlights is one of the main technical challenges for travel photographers in Utah.
This guide walks you through how to photograph red rocks without blown highlights on real-world trips, from Salt Lake City walking tours to long scenic drives toward Arches and southern Utah. You will learn why desert light is so unforgiving, how to choose the best time to shoot, which camera settings actually protect detail, and how to work efficiently on guided day tours where the schedule is tight.
Along the way, you will see practical examples from typical MateiTravel itineraries around Utah, plus common mistakes to avoid and a simple checklist you can use before every stop.
Why do red rocks blow out so easily?
The extreme contrast problem
Red rock walls often sit under wide open sky with no trees, buildings, or clouds to soften the light. The sun hits bare stone directly, while cracks and canyons drop into deep shade. That big difference between bright and dark areas is what pushes your camera past its comfort zone.
When the contrast in the scene is higher than your camera can record, it has to “choose” what to keep. If it exposes for the shadows, the bright sunlit rock turns into featureless white. If it exposes for the highlights, the shadows go near black. The trick is learning how to bias your exposure toward highlight detail without losing the overall look you want.
Sensor limitations in desert light
Every modern camera sensor has a limited dynamic range. That is the span from the darkest detail it can record to the brightest highlight before it clips. Midday in a Utah canyon can easily exceed that range. Even the best sensors will struggle when the sun is high and the rock is highly reflective.
As one photography textbook puts it:
“High desert sun creates contrast beyond what most sensors can record in a single exposure. The solution is not more ISO, but better control of exposure and timing.”
Landscape Photography Handbook
So the solution is not to push your camera harder. It is to work smarter with exposure, timing, and composition.
Color and white balance challenges
Red sandstone throws another curveball. It reflects warm light back into the scene, tinting shadows and midtones. Your camera’s auto white balance can misread that and cool things down too much, or swing between frames as you recompose.
When the color shifts, it becomes much harder to judge exposure on the back screen. A slightly warm overexposed rock may still look good in the field, but at home you will see it lacks texture and prints poorly.
Choosing the best time and weather for red rock photos
Golden hour advantages
Early and late light are your best friends in red rock country. The sun is lower, contrast is gentler, and the warm tones in the rock really glow. You get more texture on the rock face and less risk of blown highlights at the same time.
On day tours from Salt Lake City to Arches National Park, guides usually plan key viewpoints for softer light when possible. You may not always hit perfect sunrise or sunset, but even an hour after sunrise is much kinder than midday.
Overcast and hazy days
Many travelers feel disappointed when they see clouds or haze in the forecast. For photographers, those are often the best days. Thin clouds act like a giant diffuser and lower contrast on the cliffs. Colors stay rich and your sensor can record more detail in a single frame.
Scenic day tours of southern Utah often include a mix of open desert and canyon overlooks. On overcast days, you can shoot throughout the schedule instead of hiding from midday sun. It becomes much easier to keep both sky and rock within range.
Midday sun and when it still works
Midday is the hardest time. The light is short, harsh, and very strong. That said, you will still have plenty of midday stops on national park tours that start from Salt Lake City. The key is to change how you shoot at that time.
At midday, look for scenes with less sky and more evenly lit rock, or use the rock itself to block direct sun from the frame. Tight details, patterns in the sandstone, and shaded canyon walls usually hold highlight detail much better than wide open vistas.
You found a hidden promo code!
Use code WOWBLOG at checkout and get 10% OFF any tour!
Limited time offer. Book now and save!
Browse ToursCamera settings that protect your highlights
Metering for the bright areas
To keep texture in red rock, you must tell your camera to take the bright parts seriously. That usually means metering on the sunlit rock instead of on dark foreground or people in shadow. It is better to let the darkest cracks go very dark than to lose the glow on the cliffs.
In practice, point your metering area at the brightest important part of the rock face, lock that exposure, then recompose. If your camera allows a highlight-weighted metering mode, that can also help. The goal is simple. Do not trust matrix metering alone when most of the frame is dark canyon with a bright strip of rock.
Using exposure compensation
Once you meter for the scene, nudge exposure to the safe side. In harsh desert light, dialing in negative exposure compensation is often the easiest way to protect highlights. A shift of –0.3 to –1 stop is common for sunlit cliffs with dark shadows.
On busy day tours you rarely have time for long testing. A practical habit is to start with a small negative compensation whenever you face bright rock, then quickly check your histogram and adjust a little more if the right edge is still hitting the wall.
Practical starting settings for Utah landscapes
You can adjust endlessly, but it helps to have a default setup. For most static red rock scenes in good light, think along these lines:
- Aperture: Use a narrower aperture to keep the whole cliff sharp. Around f/8 to f/11 is a solid starting point for landscapes.
- ISO: Keep ISO as low as conditions allow to hold maximum dynamic range. Many cameras perform best at their base ISO.
- Shutter speed: Let the camera choose it in aperture priority, then check that it is fast enough for handholding. If it drops too low, raise ISO a little instead of opening the aperture too much.
In short, default to an aperture that gives depth of field, a low ISO for dynamic range, and enough negative exposure compensation to protect the brightest rock.
Field techniques on Utah day tours
Working quickly on Salt Lake City walking tours
Salt Lake City walking tours focus more on historic buildings, hidden corners, and the story of how the city developed. The light can still be tricky though, especially when bright stone facades face a clear sky. Groups are small, which is great for asking the guide to pause for a moment while you finish a composition.
Before each stop, quickly check your exposure compensation and white balance. Architectural details often mix sun and shade, so meter for the brightest stone and let darker doorways drop into shadow. Because you are on foot, you can often shift your angle slightly to avoid pure white reflections.
Shooting viewpoints on Arches National Park day trips
On day tours from Salt Lake City to Arches National Park, you usually travel by vehicle with scheduled stops at overlooks and trailheads. Time at each location is limited, but guides give you enough time for short hikes and photos. The key is to have a simple routine the moment you step off the vehicle.
Start with one wide scene that exposes properly for the main rock formation, then move to details. For the main scene, check your histogram, not just the preview. If the right side is climbing the wall, cut exposure slightly until it just pulls back. Then shoot variations without changing that exposure unless light clearly shifts.
Scenic day tours of southern Utah on the move
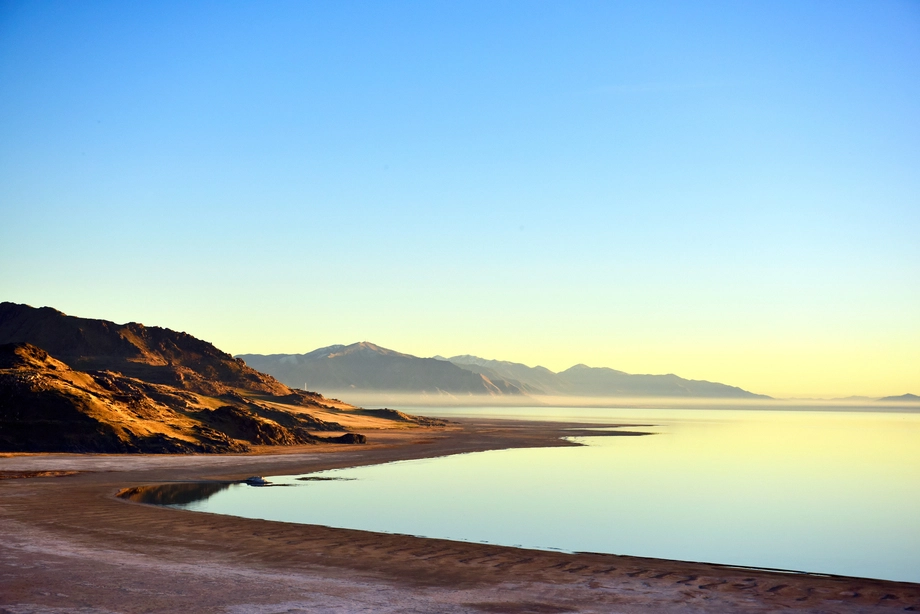
Many scenic day tours of southern Utah combine open desert, canyons, and overlooks such as the Bonneville Salt Flats or Antelope Island style landscapes. The schedule balances driving time with on-location time so you still get a rich day without feeling rushed.
Photo-wise, this constant change of scenery can tempt you to chase every angle. Instead, pick two or three stories you want to tell at each stop. Maybe one is the grand vista, one is the texture in the rock, and one is the human scale, such as your group walking along the ridge. Use similar exposure logic for all three. Protect the highlights on the bright rock and let everything else follow.
Pros and cons of photographing red rocks on guided tours
Advantages of guided Utah photo days
- No logistics stress: Tours from Salt Lake City to national parks handle transport, timing, and routing. You can focus on looking for light and composition instead of maps and parking.
- Local knowledge: Guides know which viewpoints work best at different times of day. That improves your odds of softer light on key red rock formations.
- Efficient itineraries: Scenic day tours of Utah balance driving with photo stops. You see more locations in one day than most visitors could manage alone.
- Context for your images: Stories about geology and history give your photos meaning. You remember why that ridge matters, not just how it looked.
- Support for all skill levels: Small walking tour groups make it easier to ask basic questions about where to stand and when to shoot.
Limitations to be aware of
- Fixed schedule: You cannot always wait for perfect light. Sometimes a grand vista happens right at midday and you must adapt your exposure.
- Limited time at stops: On national park day tours that start in Salt Lake City, each stop has a set duration. You have to work quickly and cannot experiment for hours.
- Shared viewpoints: Popular overlooks can be busy. You may need to adjust your composition to avoid crowds instead of picking the absolute ideal spot.
- No heavy gear setups: Fast-moving groups make it harder to set up complex rigs. You benefit more from simple, fast techniques than from elaborate equipment.
- Weather is luck: You cannot reschedule a whole tour for the perfect cloud. Learning to work with whatever sky you get is part of the game.
Common mistakes when shooting red rocks
Trusting the LCD brightness alone
One of the biggest errors is judging exposure by how bright the preview looks on the back screen. In desert sun, many people raise screen brightness to see anything at all. That makes a slightly blown rock face look normal and hides clipped highlights.
Instead, use the histogram or highlight warning if your camera has it. If large areas of the rock blink or the histogram slams hard into the right edge, you are already losing detail even if the preview looks fine.
Ignoring the histogram
Some photographers feel histograms are “too technical”. In reality, they are a simple graphic safety net. When you shoot bright sandstone, you want the bulk of the data to sit away from the far right edge. That leaves some room for bright detail without clipping.
A quick glance can save a whole series. If you see a tall spike pinned to the right, back down your exposure, even by a third of a stop, and shoot again. It only takes seconds on a tour stop.
Wrong white balance on warm rock
Auto white balance often cools down warm scenes because it tries to neutralize strong color casts. In red rock landscapes, that can lead to pale, washed-out cliffs and odd skin tones in front of them.
Set a consistent white balance preset that fits the light, such as daylight for most sunny shots or cloudy for overcast conditions. You can fine-tune in post, but keeping it steady helps you judge exposure more reliably on the screen.
Rushing compositions on tight schedules
Guided tours move. When the guide says you have twenty minutes at an overlook, the first reaction is often to fire away from the nearest railing. Those photos rarely become favorites. They also often include empty blue sky with no texture, which increases the risk of blown highlights near the horizon.
Take thirty seconds at the start to walk a few steps left or right, lower your angle, or use foreground rock to balance the sky. A better composition often lets you crop out featureless bright areas and keeps more of the important rock within your sensor’s range.
Practical examples from real tour scenarios
Sunrise-style light near Arches National Park
Imagine an early stop on a tour toward Arches National Park. The sun has just cleared the horizon and lights up a huge red wall. The rock glows, but the contrast is not yet brutal. You meter on the brightest sunlit part of the rock, add a small negative exposure compensation, and take a test shot.
The histogram shows data well away from the right edge with a gentle slope into the highlights. You are safe to shoot variations. As the sun climbs and light gets stronger, you gradually increase your negative compensation to keep that same gentle buffer, even though the scene looks similar to your eyes.
Harsh sun on bright flats
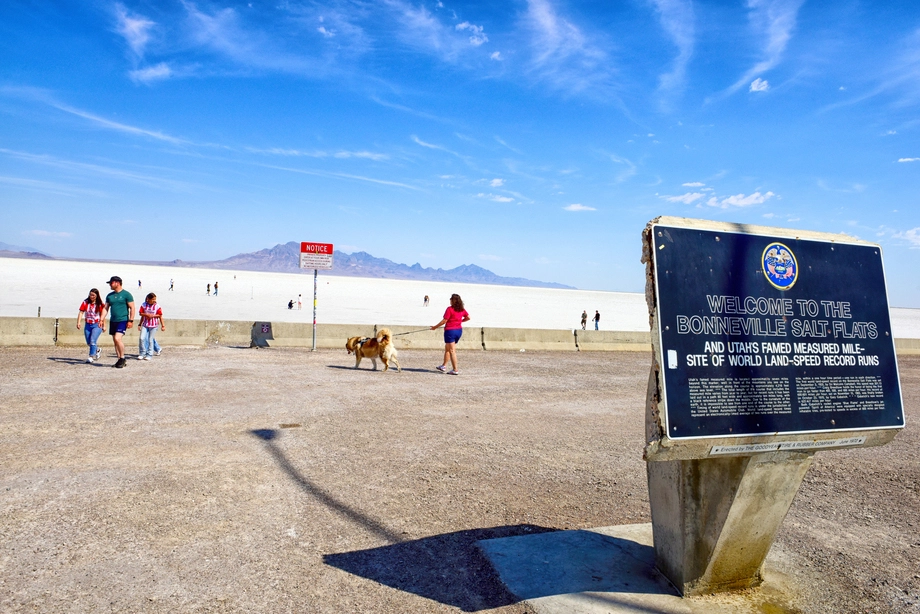
Later in the trip you might visit a wide open desert or a bright salt flat site similar to the Bonneville Salt Flats on a day tour from Salt Lake City. Here the ground is bright and reflective, and there is almost no shade. The whole frame tries to push your sensor to the limit.
In this situation, you accept that shadows will go deep. You meter for the brightest ground or rock, apply stronger negative compensation, and watch the histogram carefully. You can often save the drama of the scene by embracing silhouettes or very dark midtones instead of trying to lift everything.
Soft light on a Salt Lake City façade
Back in Salt Lake City, you join a walking tour through the downtown core. A local guide points out a historic building with detailed stonework just as clouds cover the sun. The light becomes soft and even. This is a great moment for texture and color.
You can now reduce or remove your negative exposure compensation, since the contrast has dropped. Meter on the mid-tone stone, keep an eye on the histogram out of habit, and focus on framing. Because tours provide detailed route descriptions in advance, you can even plan which buildings to watch for based on the time of day and forecast.

Actionable tips for better red rock images
Checklist before you leave Salt Lake City
- Clean your lenses: Dust and desert grit show up strongly against bright rock and sky. Start the day with clean glass.
- Set consistent white balance: Pick daylight or cloudy instead of auto for most outdoor shots to keep exposure feedback more reliable.
- Enable histogram or highlight warnings: Make sure you can see clipping quickly on the back screen before you board the tour vehicle.
- Pack simple, light gear: Guided tours move at a steady pace. Light gear means you can react faster and try more angles.
On-location routine at each stop
It helps to follow the same quick routine at every overlook, whether you are on a national park itinerary or a short day tour around Utah’s open spaces.
- Scan the light: Ask yourself where the brightest important rock is and where the deepest shadows are.
- Set exposure for the highlights: Meter on the bright rock and dial in slight negative compensation as a starting point.
- Check the histogram: Make one test frame and adjust until the right edge just clears the wall.
- Refine composition: Move your feet, adjust your angle, and decide which story you want to tell before firing off dozens of frames.
Post-processing basics to tame highlights
Even with careful exposure, a bit of editing helps red rock images shine. Start by gently pulling down highlights and raising shadows only enough to show important detail. Avoid pushing sliders so far that the rock looks flat or gray.
Increase local contrast in the midtones rather than globally. That keeps texture in the rock without pushing the brightest areas back toward clipping. A small boost in clarity or texture on the rock face, combined with a slight warm tint, usually brings back the feeling of standing there in person.
Comparing light conditions for red rock photography
Different times of day give very different exposure challenges. Here is a quick comparison you can keep in mind on MateiTravel tours.
| Time of day | Contrast level | Highlight risk | Best use |
|---|---|---|---|
| Sunrise / Sunset | Low to medium | Low | Wide vistas, glowing rock, balanced sky |
| Early / Late morning | Medium | Medium | Cliff faces, side-lit textures |
| Midday clear sky | High | High | Details, shade, silhouettes, patterns |
| Overcast daytime | Low | Low | Color-rich scenes, people in landscape |
Tour options and how they affect your shooting
The type of MateiTravel experience you choose shapes the kind of red rock photos you can bring home. Here is how several common tour styles relate to photography.
| Tour type | Main focus | Photo opportunities | Exposure challenge |
|---|---|---|---|
| Salt Lake City walking tours | History and city layout | Stone facades, hidden alleys, changing light on buildings | Mixed sun and shade, bright sky above streets |
| Day trips to Utah ski resorts | Time on the slopes | Snowy peaks, forested ridges, resort views | Very bright snow, deep tree shadows |
| Day tours from Salt Lake City to national parks | Iconic landscapes | Red rock arches, canyon rims, roadside overlooks | Wide contrast between sky and rock |
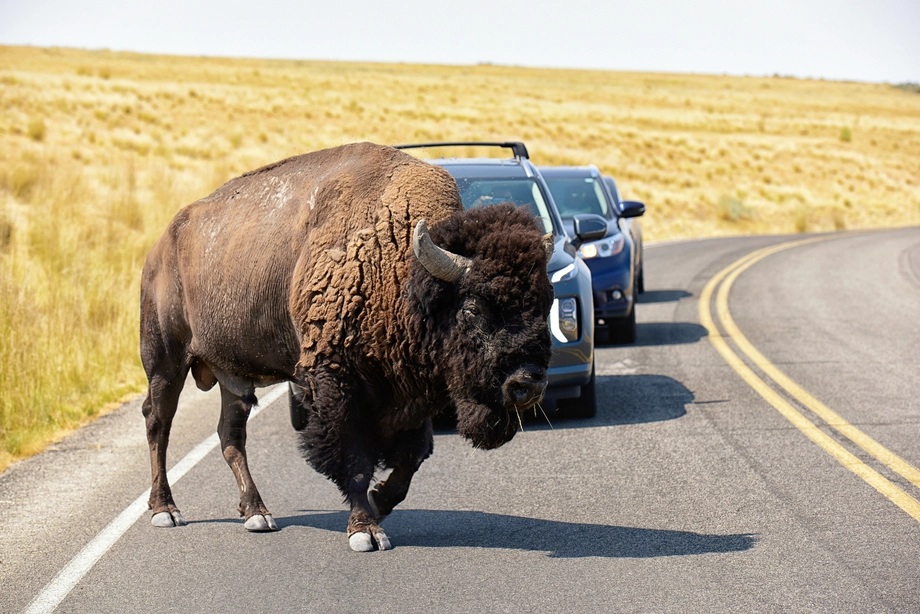
| General day tours across Utah | Mixed natural highlights | Salt flats, islands, wildlife, open desert | Bright ground and sky, little natural shade |
Once you know the pattern of a tour, you can plan when to be most alert for difficult light and when you can relax a bit and experiment.
Bringing it all together for clean red rock exposures
Photographing red rock landscapes without blown highlights is less about gear and more about timing, observation, and a few simple habits. You watch the light, expose for the bright rock, and use your histogram rather than trusting the screen alone. Guided tours from Salt Lake City to Utah’s national parks and cities give you the logistics and local insight so you can focus on those creative decisions.
To sum up, prioritize golden hours and overcast moments when you can, and switch to details or shaded scenes when the sun is brutal. Meter for the highlights, accept deep shadows when necessary, and refine your composition instead of fighting the sky. If you want a structured way to practice these skills in some of the West’s most dramatic scenery, consider joining a MateiTravel day tour that fits your schedule and start building a portfolio of red rock images you are proud to print.
FAQ
How can I avoid blown highlights when photographing sunlit red rock cliffs?
Meter on the brightest important part of the rock, then apply slight negative exposure compensation and check your histogram. Adjust until the right side of the histogram is just clear of the edge, even if the preview looks a bit dark.
What time of day is best for red rock photos on Utah day tours?
Sunrise and sunset give the softest contrast and lowest risk of blown highlights, especially for wide vistas. Early and late morning still work well, while harsh midday sun is better for details, shaded canyon walls, or silhouettes.
How should I set my camera before leaving Salt Lake City for a tour?
Clean your lenses, choose a consistent white balance like daylight or cloudy, enable the histogram or highlight warning, and use an aperture that gives enough depth of field, such as around f/8. This simple setup helps you react quickly at each stop.
Why is my camera’s auto white balance a problem in red rock landscapes?
Auto white balance often tries to neutralize the strong warm tones reflected by sandstone, which can cool your images and make cliffs look pale. It can also shift between shots, making exposure harder to judge, so a fixed preset is more reliable.
What should I do differently at midday on a national park tour?
At midday, avoid wide scenes with lots of bright sky and instead focus on details, patterns, and shaded areas. Meter carefully for the brightest rock, accept that some shadows will go very dark, and use stronger negative exposure compensation if the light is extremely harsh.
How does a walking tour in Salt Lake City help me practice exposure skills?
City walks mix sunlit stone facades, shadowed streets, and bright sky, which is similar to red rock contrast but on a smaller scale. With small groups and flexible pacing, you can practice metering for bright stone, checking the histogram, and refining composition without the pressure of huge vistas.
What quick routine should I follow at each photo stop on a guided tour?
First, scan the light and find the brightest important rock. Then set exposure for that highlight with a bit of negative compensation, take a test frame, and read the histogram. Once exposure is safe, spend the rest of your time refining composition and capturing a few strong variations.
How do MateiTravel’s day tours support better red rock photography?
MateiTravel handles transport, routing, and timing for walking tours, ski resort day trips, and national park visits, so you can focus on light and composition. Local guides choose viewpoints and schedules that offer a mix of golden hour, soft overcast, and workable midday conditions for your photos.

 Antelope Island Sunset Wildlife Expedition – Great Salt Lake Odyssey
 Salt Lake City – The City of Zion. Historical Interactive Walking Tour
 Bonneville Salt Flats – Sunset Adventure of the White Desert
 Antelope Island – Wild Heart of the Great Salt Lake Adventure
 Bonneville Salt Flats – Journey to the Edge of the World