How to Plan a Zion Sunset Photo Tour from Springdale Viewpoints Like a Pro
Apr 12, 2026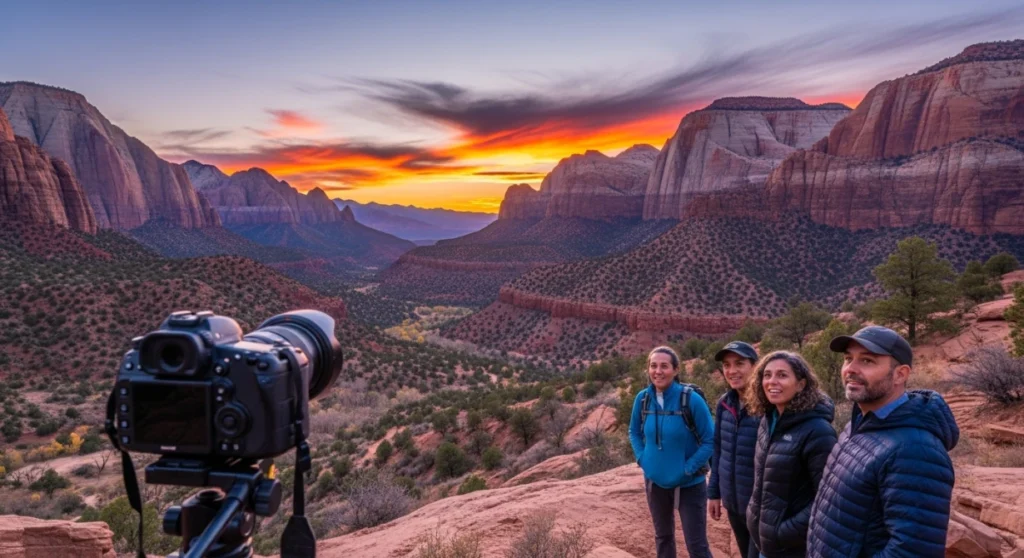
Plan around shuttle and sunset times, pick one main and one backup viewpoint, pack a lean kit, and build in early decision points and safety buffers to adapt your Zion sunset session from Springdale.
The most common mistake I see is people rolling into Springdale at 4 pm, grabbing their camera, and assuming the canyon will “just work out” for sunset. Zion rewards intention, not improvisation. Light moves fast between these cliffs, parking and shuttles have strict rules, and the best viewpoints are not always the obvious ones you see from the road.
If you plan your evening like a real shoot instead of a casual stroll, you can turn a few golden hours into a full, efficient sunset photography tour of Zion’s canyon from Springdale viewpoints. That means knowing whether this approach is even right for you, choosing the right locations, and timing every move around the shuttle and the sun.
Let’s walk through how to design a sunset session that fits your skills, your gear, and the current conditions, while staying realistic about logistics and backup plans.
When a DIY Zion sunset from Springdale works (and when it does not)
Not everyone should jump straight into a self-planned evening shoot. The canyon can be overwhelming if you are short on time, unfamiliar with National Park logistics, or traveling with a group that has different expectations.
Use this plan if:
- You are based in Springdale for the night: You have at least one full afternoon and evening without a long drive back to Salt Lake City or another town.
- You are comfortable walking with gear: Short hikes on paved or well-trodden trails with a backpack and tripod feel manageable.
- You prefer creative control: You like deciding where to stop, how long to stay, and how to react if the light changes.
- You do basic research ahead of time: You are willing to check shuttle hours and sunset time and adjust your schedule.
Consider a guided or different approach if:
- You only have one day in Utah: A broader itinerary like Zion national park tours from Salt Lake City can maximize multiple viewpoints when you cannot stay overnight in Springdale.
- You dislike logistics: Parking rules, shuttle schedules, and timing hikes around sunset feel stressful instead of fun.
- Your group has mixed goals: Some people mainly want casual sightseeing while others are focused on serious photography.
- You are exhausted from travel: A slow evening in Springdale with one easy viewpoint is better than forcing a complex plan you cannot safely execute.
Use this gate honestly. If a DIY sunset plan sounds exciting and manageable, keep going. If it already feels like too much, scale it down or consider a guided option on another day.
Preparation: what you need before you leave Springdale
The most efficient sunset sessions are decided in Springdale, not at the bus stop in the park. Think in terms of three buckets: timing, locations, and gear.
1. Lock in time windows and shuttle logistics
The canyon layout and shuttle system control how much you can realistically do. Before you pack your bag, check three things in Springdale:
- Official sunset time: Note sunset plus 20–30 minutes of post-sunset glow. This is your real “end” for canyon color.
- Shuttle operating hours: Note the last shuttle up-canyon and the last one back out so you do not get stranded at a trailhead in the dark.
- Walking pace of your group: If someone is slower or carrying heavy gear, build that into your timing rather than racing the clock.
Once you have those times, pick a latest-possible shuttle up-canyon that still gives you flexibility for two or three stops.
2. Choose your primary and backup viewpoints
Pick one “hero” location as your main sunset shot, then 1–2 backups that you can reach quickly if the light changes or crowds block your first plan.
Use this simple comparison to decide how ambitious your evening should be:
| Viewpoint style | Effort level | Best for | Risk level |
|---|---|---|---|
| Roadside / shuttle-stop views | Very low | Short trips, heavy gear, mixed groups | Low, easy to bail or move |
| Short walks on paved or smooth paths | Low to moderate | Balanced photos and comfort | Moderate, need more timing margin |
| Longer hikes with elevation | High | Experienced hikers with extra time | High, easier to misjudge light |
If this is your first visit or you are tired from travel, stick to the first two rows. You will still get great canyon walls, glowing cliffs, and river reflections without the pressure of a long return in diminishing light.
3. Pack a streamlined photography kit
Overpacking kills mobility. Aim for a tight kit that covers your core needs instead of every lens you own.
- Camera and one or two lenses: Pair a wide angle for canyon scenes with a mid-range or short telephoto for compressing cliff layers.
- Tripod: Useful once the canyon falls into shade and your shutter speeds drop.
- Filters (optional but helpful): A circular polarizer for glare on water and rock, and maybe a neutral density filter if you want silky river shots.
- Headlamp or small flashlight: For safe walking after civil twilight if you cut it close to the last shuttle.
- Layers and water: Temperatures drop quickly after the sun sets behind the canyon rim, even on warm days.
Lay everything out on your bed in Springdale. If it does not directly help you handle low light, high contrast, or comfort, consider leaving it behind.
You found a hidden promo code!
Use code WOWBLOG at checkout and get 10% OFF any tour!
Limited time offer. Book now and save!
Browse ToursStep-by-step evening workflow from Springdale
With your timing, locations, and gear set, treat the evening like a flexible sequence. Each step should end with a quick check that tells you whether to push forward or pivot to your backup.
Step 1: Final check in town (60–90 minutes before sunset)
Before entering the park, pause for five minutes and confirm three details on your phone or a note:
- Sunset and shuttle times match your plan: Adjust if any schedule changed since the morning.
- Weather and cloud cover: High thin clouds can make a long glow, while a solid overcast may favor closer river scenes instead of wide canyon views.
- Group energy level: If people are dragging, downgrade your plan to closer stops rather than push for distant trailheads.
This is the last easy moment to pivot, grab a quick early dinner, and switch to a simpler one-stop shoot if needed.
Step 2: Enter the park and ride the shuttle up-canyon
Board a shuttle that gives you at least 45–60 minutes until sunset when you reach your first canyon stop. Sit on the side that faces your primary direction of interest so you can scout on the way.
Use the ride to do a rolling location check:
- Note where cliffs are already in shade: Fully shaded walls are better for even-toned, subtle shots rather than dramatic glowing rock.
- Watch how light rakes across the canyon: You may see a mid-route stop that looks better than your original plan. It is fine to swap if it gives you better angles.
- Check crowd levels at stops: If platforms look packed, be ready to use your backup stop where you can move more freely.
Step 3: First stop – scout and shoot the “safe” shots
Get off at your first chosen stop at least 30–45 minutes before sunset. Treat this as your insurance location. Even if you move later, you already have strong shots in the bag.
Work through this quick sequence:
- Walk 2–5 minutes away from the cluster: Many people stay near the shuttle stop. Even a short walk opens cleaner compositions.
- Start with wider scenes: Capture the canyon context while the light still reaches the upper walls.
- Add foreground: Look for rocks, trees, or water curves to anchor the frame.
- Check your histogram: Sunset contrast can fool your screen. Adjust exposure compensation or use bracketing if needed.
After 10–15 minutes, ask yourself if this location still has clear potential for peak color. If not, and you have at least 30 minutes until shuttle cutoff, consider moving.
Step 4: Optional move to a second viewpoint
This is the decision point that separates a relaxed, single-location shoot from a more dynamic evening. Only move if these three boxes are checked:
- You know exactly where you are going: No guesswork about trail length or shuttle stop.
- You have at least one shuttle buffer: You do not rely on the very last shuttle up or down to get back.
- The new spot offers a clearly better angle: Different foreground, better view down-canyon, or a reflection you cannot get at your current stop.
If all three are true, ride one or two stops and repeat a shorter version of Step 3. If even one box fails, stay put and work your current scene more deeply.
Step 5: Late blue hour and exit
Once the sun is below the rim, contrast softens and color often intensifies. This is when slower shutter speeds make your tripod essential.
Focus on:
- Reflections and silhouettes: River surfaces, tree outlines, and cliff edges against the remaining sky color.
- Longer exposures: Smooth water or motion blur in trees if there is wind.
- Safety margin: Plan to wrap up shooting 10–15 minutes before the last shuttle from your stop.
On the way back to Springdale, review thumbnails, not just your hero shots. Notice what angles worked or failed so you can refine the next evening if you have another night in town.
How to judge whether your sunset plan actually worked
Once you are back in your room, do a quick quality assessment. This is not about artistic perfection. It is about testing whether your workflow and planning were sound.
Success signals
- On-time arrivals: You reached each planned stop with at least 20 minutes of usable light and never felt rushed to pack up.
- Technical consistency: Most frames are sharp, properly exposed, and not blown out in the sky or crushed in the shadows.
- Variety in your gallery: You have a mix of wide canyon scenes, mid-range layers, and at least a few intimate details or foreground-driven compositions.
- Energy at the end: You finished with enough energy that you would happily repeat a similar plan the next day.
Warning signs you should adjust next time
- Repeated timing stress: You kept checking shuttle times and felt like you were racing sunset rather than working it.
- Only one angle per stop: Every photo looks similar because you did not have time or space to explore.
- Gear fatigue: Your bag felt too heavy, or you avoided moving because packing was a hassle.
- Missed peak color: Your best cliff glow happened while you were on the shuttle instead of on location.
If several warning signs show up, simplify. Fewer locations, lighter gear, and more generous timing windows usually lead to better photos and less stress.
Fallback paths when your Zion sunset plans fall apart
Even a solid plan can unravel. Clouds can thicken, shuttles fill, or you simply misjudge timing. The key is having backup templates instead of giving up on the evening.
If the shuttle is too crowded or you missed your ideal departure
- Switch to a closer stop: Get off earlier than planned at a less popular stop where you can still walk to open views.
- Use roadside or near-stop compositions: Stay within a short walk so you do not stress about the last shuttle back.
- Reframe the goal: Focus on practicing compositions, bracketing, or long exposures rather than chasing the single “grand” shot.
If the weather turns overcast or smoky
Flat light can be a gift if you adapt the subject matter.
- Look down instead of up: Emphasize river textures, foliage, and rock details that benefit from reduced contrast.
- Lean into monochrome thinking: Compositions with strong shapes and layers will still work well, even if color is muted.
- Stretch blue hour: Overcast evenings often have a long, subtle twilight that suits slow-shutter, tripod-based shots.
If you realize you aimed too big
Ambitious multi-stop plans can feel overwhelming on a first visit.
- Abort the second stop: Stay at your first viewpoint and fully explore it instead of chasing a distant alternative.
- Shorten hikes: Turn around earlier on any trail that feels longer than expected and work with the views you already have.
- Learn for next time: Note which parts of your plan were unrealistic so you can design a calmer evening on your next trip.
How Springdale-based sunset sessions compare to day tours from Salt Lake City
Many visitors combine Springdale stays with broader Utah National Parks experiences that start in Salt Lake City. Understanding the trade-offs helps you decide how to allocate your limited evenings.
| Option | Main advantage | Main limitation | Best suited for |
|---|---|---|---|
| Evening from Springdale | Maximum time in the canyon during golden hour and blue hour | Requires you to manage your own logistics and scouting | Photographers who want control and repeat visits to the same area |
| Utah National Parks tours from Salt Lake City | Guides handle long drives, parking, and key viewpoint logistics | Less flexibility for lingering at one spot for the “perfect” light | Travelers who want iconic sights with context and minimal planning |
| Salt Lake City walking tours | Local guides share history and hidden corners of the city itself | No direct access to Zion or canyon landscapes | Visitors with an extra day in the city before or after park visits |
Multi-park itineraries that begin in Salt Lake City usually emphasize efficient routing, scenic drives, and short, accessible walks, which are ideal when your priority is seeing more of Utah rather than repeating the same canyon at multiple light conditions.

Common planning mistakes for Zion sunset photography from Springdale
Avoiding a few frequent errors can instantly improve both your images and your experience.
- Ignoring the canyon’s orientation: Light hits different walls at different times, so a cliff that glowed at 5 pm earlier in the year may be in shade during your visit.
- Trusting only your camera screen: Brightness previews lie. Use your histogram to avoid clipped highlights in the sky.
- Underestimating shuttle buffers: Planning around the last possible shuttle leaves no room for experiments or a few extra long exposures.
- Carrying every lens you own: A heavy bag makes you less willing to move, which hurts your compositions far more than leaving one specialty lens at home.
- Skipping a safety light: Relying on a phone flashlight drains your battery and narrows your vision. A small headlamp weighs little and keeps your hands free.
Practical recommendations to get pro-level results
With the fundamentals in place, a few targeted habits can push your work beyond standard snapshots.
- Pre-visualize three frames: Before you leave Springdale, sketch or imagine one wide scene, one layered cliff composition, and one detail shot. Hunt intentionally for them once in the canyon.
- Bracket selectively: For high-contrast scenes with bright sky and dark canyon floor, shoot a short exposure series at different shutter speeds so you can choose the best or blend later.
- Use people for scale, not dominance: Keep hikers or shuttle silhouettes small in the frame to show the canyon’s size without turning the photo into a portrait.
- Return to the same spot: If you stay multiple nights, repeat a successful viewpoint and try a different focal length or foreground. Familiarity often beats novelty.
- Review with intent: Each night, flag 5–10 favorites and ask what made them work. Then build those strengths deliberately into the next session.
How sunrise-focused travelers might use Salt Lake City instead
Some photographers focus more on early light than on sunset. In that case, starting from a city base can make sense, especially if you mix in urban exploration with canyon scenes.
There are visitors who use a private day tour from Salt Lake City to Zion for sunrise photography to concentrate their effort on first light and then return to the city, where they might join small-group walking tours downtown led by local guides who know the layout, history, and lesser-known corners of the area. Those same travelers often head south later to spend slower evenings in Springdale once they already have a set of sunrise canyon images.
Planning sunrise and sunset sessions as separate “projects” with their own logistics and goals leads to better results than trying to squeeze both into one rushed day.
Think of sunrise trips as your high-effort, high-reward missions, and Springdale-based sunsets as your more flexible, creativity-focused sessions.
A well-planned Zion sunset from Springdale hinges on three things: realistic timing, clear viewpoint priorities, and a lean kit you can move with comfortably. When you treat the evening as a sequence with built-in checkpoints and backups, you reduce stress and give yourself space to notice compositions others walk past. Use your first visit to learn the canyon’s light and your own limits, then refine on later evenings instead of chasing everything at once.
If you prefer to combine those personal sunset sessions with guided context and logistics on other days, MateiTravel offers Utah experiences that complement your own photography time rather than replace it. For tailored advice on weaving guided days and DIY Zion sunsets into one smooth trip, reach out to MateiTravel when you start planning.
How early should I leave Springdale for a Zion sunset shoot?
Plan to enter the park 60–90 minutes before sunset so you can ride the shuttle, scout your first stop, and shoot without rushing.
How many viewpoints can I realistically cover in one evening?
Most visitors handle one primary and one backup viewpoint well. Trying to shoot three or more often leads to missed peak light and stress.
Do I need a tripod for sunset in Zion’s canyon?
A tripod is not mandatory, but it greatly helps once the canyon floor goes into shade and you want sharp long exposures or blue-hour images.
What if clouds block the sunset color?
Shift your focus to close-up textures, river scenes, and shapes that benefit from softer, low-contrast light instead of wide skyline views.
How do I avoid missing the last shuttle back to Springdale?
Set an alarm for 20–30 minutes before the final shuttle at your stop and wrap up shooting a bit early so you can walk back comfortably.
Is it better to do one big hike or several short stops for sunset?
For most photographers, several short stops near shuttle points are safer and more flexible than one long hike that is hard to time.
Can I still get good photos if I only use roadside views?
Yes, roadside and near-stop viewpoints can give impressive canyon scenes, especially if you work carefully with foregrounds and changing light.
How should I review my photos after the session?
Back in Springdale, flag a small set of favorites, note what timing and angles worked, and use that insight to simplify or refine the next evening’s plan.

 Bonneville Salt Flats – Sunset Adventure of the White Desert
 Antelope Island – Wild Heart of the Great Salt Lake Adventure
 Bonneville Salt Flats – Journey to the Edge of the World
 Salt Lake City – The City of Zion. Historical Interactive Walking Tour
 Antelope Island Sunset Wildlife Expedition – Great Salt Lake Odyssey