How to pack light for a Utah hiking trip without missing essentials or comfort
Feb 27, 2026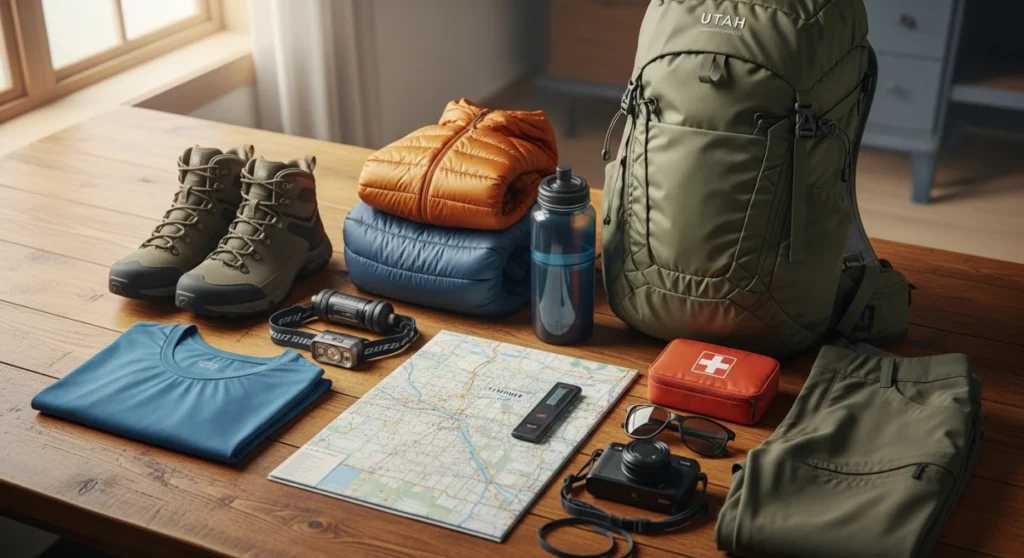
Decide your hiking style, lock in a small set of safety essentials and layers, use car or hotel caches for extras, then test your pack with a short walk and adjust before trail days.
Most people land in Salt Lake City with a suitcase full of “just in case” gear, then end up lugging half their closet through desert heat and high-elevation trails. The irony is that extra weight usually replaces the things that actually matter: water capacity, sun protection, and layers that work when the temperature swings 30 degrees in a day. Utah rewards those who pack precisely, not those who pack everything.
The weather can flip from hot slickrock sun to cold canyon shade in an afternoon, and many hikes are far from your car or hotel. That combination means your backpack needs to be light enough that you want to carry it, but complete enough that you do not have to cut a hike short. Let’s build a practical system so you can pack once and then stop thinking about your gear and start paying attention to the landscape.
Know when ultralight packing works in Utah (and when to bring more)
Before you decide to strip your bag to the bare minimum, be honest about the kind of trip you are taking. Not every itinerary is a good fit for aggressive weight-cutting, and for some travelers, a slightly heavier bag is the safer choice.
Good situations for packing very light
- Day hikes from a base in Salt Lake City: You can leave non-essentials at the hotel and only carry what you need for a single outing.
- Guided sightseeing and short walks: If your plan includes guided Utah national park tours with short optional hikes, you can safely trim technical gear and focus on comfort and sun protection.
- Shoulder-season trips (spring or fall): Temperature swings are big but predictable, so a tight set of versatile layers usually works better than bulky cold-weather clothing.
When you should not cut your kit too much
- Solo remote hikes: If you are far from services or on less-traveled trails, prioritize redundancy in water, navigation, and insulation even if the pack is heavier.
- Travel with kids or beginners: You may need extra snacks, layers, and backup gear to keep everyone safe and comfortable.
- Winter or high-alpine routes: Cold, wind, and early darkness demand more insulation and emergency items. Ultra-minimal packing is not worth the risk.
If your plan is mostly scenic driving, short viewpoints, or the best tours of Utah National Parks that handle logistics and timing, you can lean harder into light packing because professional guides help manage risk and route choice.
Preparation: define your constraints before you touch your suitcase
Packing light starts on paper, not at the closet. You want to lock in what kind of days you will actually have so your gear matches real use, not fantasy scenarios.
Step 1: Map your hiking style and transport
Write down three specifics: where you sleep, how you move between hikes, and how long the typical outing will be. A self driving tour of Utah National Parks has different packing needs than a single day added to ski-focused travel from Salt Lake City.
- Base location: Hotel in downtown Salt Lake, lodging near parks, or mixed.
- Primary transport: Rental car, guided day tours, or a mix.
- Hike length: Mostly 1–3 hour walks, or regular 5–8 hour days on trail.
These three choices decide how much you must carry yourself versus what can stay in the car or hotel room.
Step 2: Set a target pack weight and volume
A realistic target helps you decide what stays out of the bag. For most travelers doing day hikes in Utah, this is a good starting point:
| Hiking day type | Recommended pack volume | Typical carry weight (full) |
|---|---|---|
| Short scenic walks (under 2 hours) | 10–15 L daypack | 6–10 lb |
| Standard day hike (3–6 hours) | 18–25 L daypack | 10–15 lb |
| Long or remote day (6+ hours) | 22–30 L daypack | 15–20 lb |
Pick the row that matches your longest planned hike. That number is your ceiling. If your packed bag in the living room is already heavier, you know you are bringing more than you will enjoy carrying on slickrock.
Step 3: Choose your clothing “system,” not individual items
Instead of asking “Should I bring this fleece?”, build a small system that covers heat, chill, and wind with as few pieces as possible. In Utah’s desert and high plateau climate, that usually means:
- Base: One light synthetic or merino-style top that dries fast.
- Mid: One thin, compressible warm layer that fits under everything.
- Shell: One windproof or lightly water-resistant jacket for gusts and unexpected showers.
Everything should layer together. If a piece only works in one narrow temperature band, swap it for something more versatile.
You found a hidden promo code!
Use code WOWBLOG at checkout and get 10% OFF any tour!
Limited time offer. Book now and save!
Browse ToursExecution: a step-by-step process to pack light without gaps
Step 1: Lock in your “non-negotiable 10” items
Start by placing only safety and health essentials on the floor or bed. These always go into your hiking pack, no matter how short the route looks on a map.
- Water capacity: Bottles or a reservoir that allow you to carry at least 2–3 liters on hot days.
- Sun protection: Brimmed hat, sunglasses, high-SPF sunscreen, and SPF lip balm.
- Navigation: Phone with offline maps or photos of the route, plus a simple backup like a printed map segment.
- Insulation layer: One warm mid-layer that fits under your shell.
- Weather shell: Lightweight wind or rain jacket.
- Light source: Compact headlamp or flashlight with fresh batteries.
- Basic first aid: Blister care, a few bandages, and any personal medications for the day.
- Food and electrolytes: Snacks with some salt and carbs, not just sweets.
- Emergency contact info: Critical numbers written down, not just stored in your phone.
- Small repair item: A short strip of tape wrapped on a bottle or pole for quick fixes.
Put these into your empty daypack first. This guarantees that any later weight-cutting never touches your safety core.
Step 2: Add “performance comfort” items
Next, add things that make walking easier without adding much weight. These are worth carrying because they prevent common problems.
- Extra socks: One thin spare pair to swap if your feet get sandy or wet.
- Neck gaiter or bandana: Useful for sun, dust, or dipping in water to cool down.
- Lightweight gloves and beanie: For early starts or windy viewpoints, especially in spring and fall.
- Compact sit pad or trash bag: Something to sit on during breaks on rough rock.
Check your pack after adding these. If the weight is still under your target, keep them. If you are over, rank them and remove the lowest priority pieces first.
Step 3: Plan the clothing you actually wear while hiking
What you wear on your body does not count against pack volume as much, but it still affects how you feel after a few miles. Aim for one hiking outfit that does not need constant changing.
- Top: One breathable hiking shirt with sleeves you can roll up or down.
- Bottoms: One pair of sturdy shorts or lightweight pants; avoid bringing both unless you have a multi-week trip.
- Footwear: One main pair of broken-in shoes. Do not pack a second pair “just in case” unless you have a known issue.
For short hikes tied into southwest tours Utah visitors often take, you rarely need more than one hiking outfit plus a clean set of clothes back in town.
Step 4: Create a “car cache” or “hotel cache” instead of overpacking your pack
Many travelers add weight because they want options. A better solution is to separate “always carry” from “available nearby.”
- Car cache: If you are driving, keep extra layers, backup snacks, and a second pair of shoes in one small tote in the trunk.
- Hotel cache: If you take organized tours, keep your extra options in one packing cube so you can quickly adjust before you meet your guide.
This lets you adapt day by day without dragging everything onto each trail.
Step 5: Do a 5-minute “weight audit” on your final pack
Once the bag is packed, pull out anything that feels optional and ask, “Will I definitely use this at least once per day?” If the answer is not clear, it probably belongs in your car or hotel cube, not on your back.
- Heavy clothing: Remove duplicates, especially bulky sweatshirts or multiple long-sleeve tops.
- Gadgets: Keep your phone and maybe one small camera item, skip multiple lenses or devices for standard day hikes.
- “Nice to have” extras: Books, large journals, and full-size toiletries stay at your base, not in the daypack.
Pick up the pack again after every removal. Stop when it feels light enough that you would be happy to carry it for your longest planned hike.
Verification: how to know you packed light enough, but not too light
Good packing is measurable. Before leaving Salt Lake City or your first base, run a simple test so you don’t discover problems on the trail.
Signal 1: The “15-minute city walk” test
Load your daypack as if you are starting a real hike. Walk around your neighborhood or hotel area for 15–20 minutes.
- Good sign: Straps feel comfortable, nothing bounces, and you are not tempted to switch shoulders or carry the pack by the handle.
- Warning sign: Shoulder or neck tightness, constant fiddling with straps, or a sense that the pack is “pulling you backward.”
If it feels heavy in town, it will feel worse on slickrock in the sun. Go back and repeat your weight audit.
Signal 2: The essentials check without looking
Put your pack on a chair. Without opening it, list out loud where each crucial item is: water, sun protection, insulation layer, navigation, light, and first aid.
- Good sign: You can name the pocket or area for every item quickly, and you remember packing each one.
- Warning sign: You are unsure whether an item is packed or where it sits in the bag.
Any hesitation means you either overpacked (too many items blending together) or missed a critical piece. In both cases, simplify and recheck.
Signal 3: The “start cold, finish warm” clothing test
On a cooler morning, put on your full hiking outfit and stand outside for a few minutes. You should feel slightly chilled when you stand still but comfortable once you walk briskly.
- Good sign: After a few minutes of walking, you feel warm but not sweaty, and you know which layer you would remove first if needed.
- Warning sign: You are already sweating before walking, or still very cold after several minutes of movement.
Adjust your layering system rather than adding extra random pieces. One well-chosen layer is more efficient than two bulky ones.
Light packing is not about owning the least possible gear. It is about carrying only what consistently earns its place on your back in real conditions.
Fallbacks: what to do if your packing plan fails on the road
Even with a smart plan, you might misjudge weather, comfort, or trail difficulty once you arrive. Build in a few practical fallback moves so small mistakes do not ruin your hikes.
Fallback 1: You packed too light and feel underprepared
If you are short on layers or safety items once already in Utah, compensate with smarter route and timing choices rather than rushing to buy lots of new gear.
- Shorten hike length: Choose trails close to the road and trim long loops down to out-and-back sections.
- Shift to cooler times: Start at sunrise or later in the afternoon to reduce exposure if you lack sun gear.
- Choose guided experiences: Opt for structured day trips where guides manage timing and risk, so your simplified kit is enough.
Fallback 2: Your pack is clearly too heavy once you start hiking
If your shoulders hurt in the first mile, stop early and adjust. You can usually fix the problem for the rest of your trip with one focused repack.
- Empty everything onto a bed or car seat: Group items into “used today,” “might use,” and “haven’t touched.”
- Move the last group to your car or hotel cube: Keep them as reserve gear, not daily carry.
- Repack with strict order: Essentials first, then performance comfort items, then a single small “luxury” if weight allows.
Do another short walk test before your next hike so you do not repeat the same mistake.
Fallback 3: Weather is different than forecast
Utah’s conditions can change faster than your packing list. If it is colder, hotter, or windier than expected, adjust the kind of day you choose rather than forcing your original plan.
| Condition surprise | Risk if you underpacked | Practical adjustment |
|---|---|---|
| Much hotter than expected | Dehydration, sun fatigue | Pick shaded canyons or shorter trails, carry extra water, leave mid-day hours for scenic drives. |
| Much colder or windier | Chill at viewpoints, low motivation | Favor routes with steady movement, avoid long exposed ridges, take more frequent short breaks out of wind. |
| Occasional light rain | Wet, uncomfortable clothing | Prioritize your shell, choose rocky rather than clay-heavy trails that turn slick. |
Treat your original itinerary as a menu, not a contract. Flexible choices let you keep a light kit and still stay safe.

Practical examples: applying this system to real Utah days
Example 1: Three days of easy hikes from Salt Lake City
Imagine you are based in a downtown hotel, doing a mix of small city walks, a half-day scenic outing, and a light hike near the Great Salt Lake. You only need one compact daypack and one hiking outfit, plus a car or hotel cache with a warmer layer and casual shoes.
Your “non-negotiable 10” go into the pack, along with a thin extra layer and simple snacks. Because days are short and routes are close to services, you skip heavy backup items and keep bulkier clothing in the room for evenings. Your bag stays under 10 pounds, yet you are ready for typical trail and weather conditions around the city.
Example 2: Multi-park road trip with daily moderate hikes
If you are stringing together several parks by car and hiking 3–6 hours most days, you choose a 20–25 liter pack as your standard. You commit to one set of trail clothing, a single warm mid-layer, one shell, and reliable footwear.
You build a small car cache box with spare socks, an extra warm layer, and a simple backup first aid kit. Each morning you move only what you really need into the pack. Because your system is standardized, repacking takes minutes, and your daily load stays in the 12–15 pound range even as you move from dry desert to breezier canyon rims.
Common packing mistakes to avoid on Utah hikes
- Too many “just in case” clothes: Multiple pants, heavy cotton sweatshirts, and extra shirts add bulk without adding real flexibility.
- Neglecting sun and water: People obsess over gadgets and forget brimmed hats, sunscreen, and enough capacity for hot, exposed sections.
- Duplicate gear across people: Couples and friends often carry full first aid kits each. Share some items to reduce weight while keeping redundancy where it matters.
- Oversized packs: Large daypacks invite clutter. Choosing a slightly smaller, well-fitting pack forces better decisions.
How guided tours and day trips change what you need to carry
If you book structured experiences that include transport and clear walking levels, your packing can be even simpler because someone else handles navigation, driving, and timing.
| Trip style | What the operator handles | What you still must carry |
|---|---|---|
| Guided city walking tour | Route, stories, pace in the downtown area | Comfortable shoes, water, sun protection, light layer if breezy |
| Guided scenic day trip with short hikes | Driving, key viewpoints, trail choices that match the group | Daypack with the “non-negotiable 10,” snacks, personal meds, camera |
| Independent full-day hike | You handle all logistics, timing, and route | Full safety kit, navigation backups, more food and layering options |
When logistics are covered and walking distances are moderate, your own packing focus shifts from survival items to comfort, hydration, and sun management.
Packing light for a Utah hiking trip is about disciplined choices, not sacrifice. Start by defining your hiking style and safety essentials, then build a small, versatile clothing system around them. Use car or hotel caches instead of overloading your daypack, and verify your setup with simple real-world tests before you drive toward the trailhead. With a clear process and a few fallback strategies, you can travel with a compact kit and still feel prepared from city walks to canyon overlooks. When you want logistics handled so you can focus entirely on the landscape, consider letting MateiTravel take care of the planning while you bring only what you truly need.
How heavy should my Utah hiking daypack be?
For most day hikes, aim for 10–15 pounds including water and food. Longer or more remote hikes can justify up to about 20 pounds if that weight includes solid safety and weather gear.
How many hiking outfits do I really need for a week in Utah?
One main hiking outfit plus a clean set of casual clothes is enough for many travelers. Plan to rinse or air out your trail clothes rather than packing multiple duplicates.
What is the minimum water I should carry on Utah trails?
Plan to carry at least 2 liters for moderate hikes, and 3 liters or more for exposed, hot days. Always check trail length and current temperatures before deciding your final amount.
Do I need different gear if I join guided tours instead of hiking on my own?
Guided tours usually cover navigation and logistics, so you can skip extra maps and some backup gear. You still need a good daypack, sun protection, water, a light layer, and personal medications.
How can I test my packing before leaving home?
Pack your bag as if for a real hike and walk outside for 15–20 minutes. If your shoulders ache or the pack feels unstable, remove non-essential items and adjust the fit.
What should always stay in my hiking pack, no matter how short the trail?
Always carry water, sun protection, one warm layer, a simple first aid kit, a light source, and some form of navigation. These items cover the most common problems on Utah hikes.
Is a big backpack better so I have more options?
Oversized packs invite clutter and usually lead to carrying too much. A smaller, well-fitted daypack that forces choices is more comfortable and still holds all essentials.
How do temperature swings in Utah affect what I pack?
Because days can start cold and turn warm, prioritize a thin, packable warm layer and a light shell. This combination covers most swings without needing several bulky pieces.

 Bonneville Salt Flats – Sunset Adventure of the White Desert
 Antelope Island – Wild Heart of the Great Salt Lake Adventure
 Bonneville Salt Flats – Journey to the Edge of the World
 Salt Lake City – The City of Zion. Historical Interactive Walking Tour
 Antelope Island Sunset Wildlife Expedition – Great Salt Lake Odyssey